Faders
Almost anything can live on a Fader. We've taken great strides to make using Faders as simple as possible while allowing advanced users the ability to have full control over Faders as on a full-size console.
Fader Types
There are two types of Faders: Direct Load-In Faders and Sequence Faders.
Direct Load-In Faders
Direct Load-In Faders are the simplest way to create and use Faders. Just tap the Load button on the top of the Fader and you can directly load in a Fixture, Group, or Effect.
Fixture & Group Faders
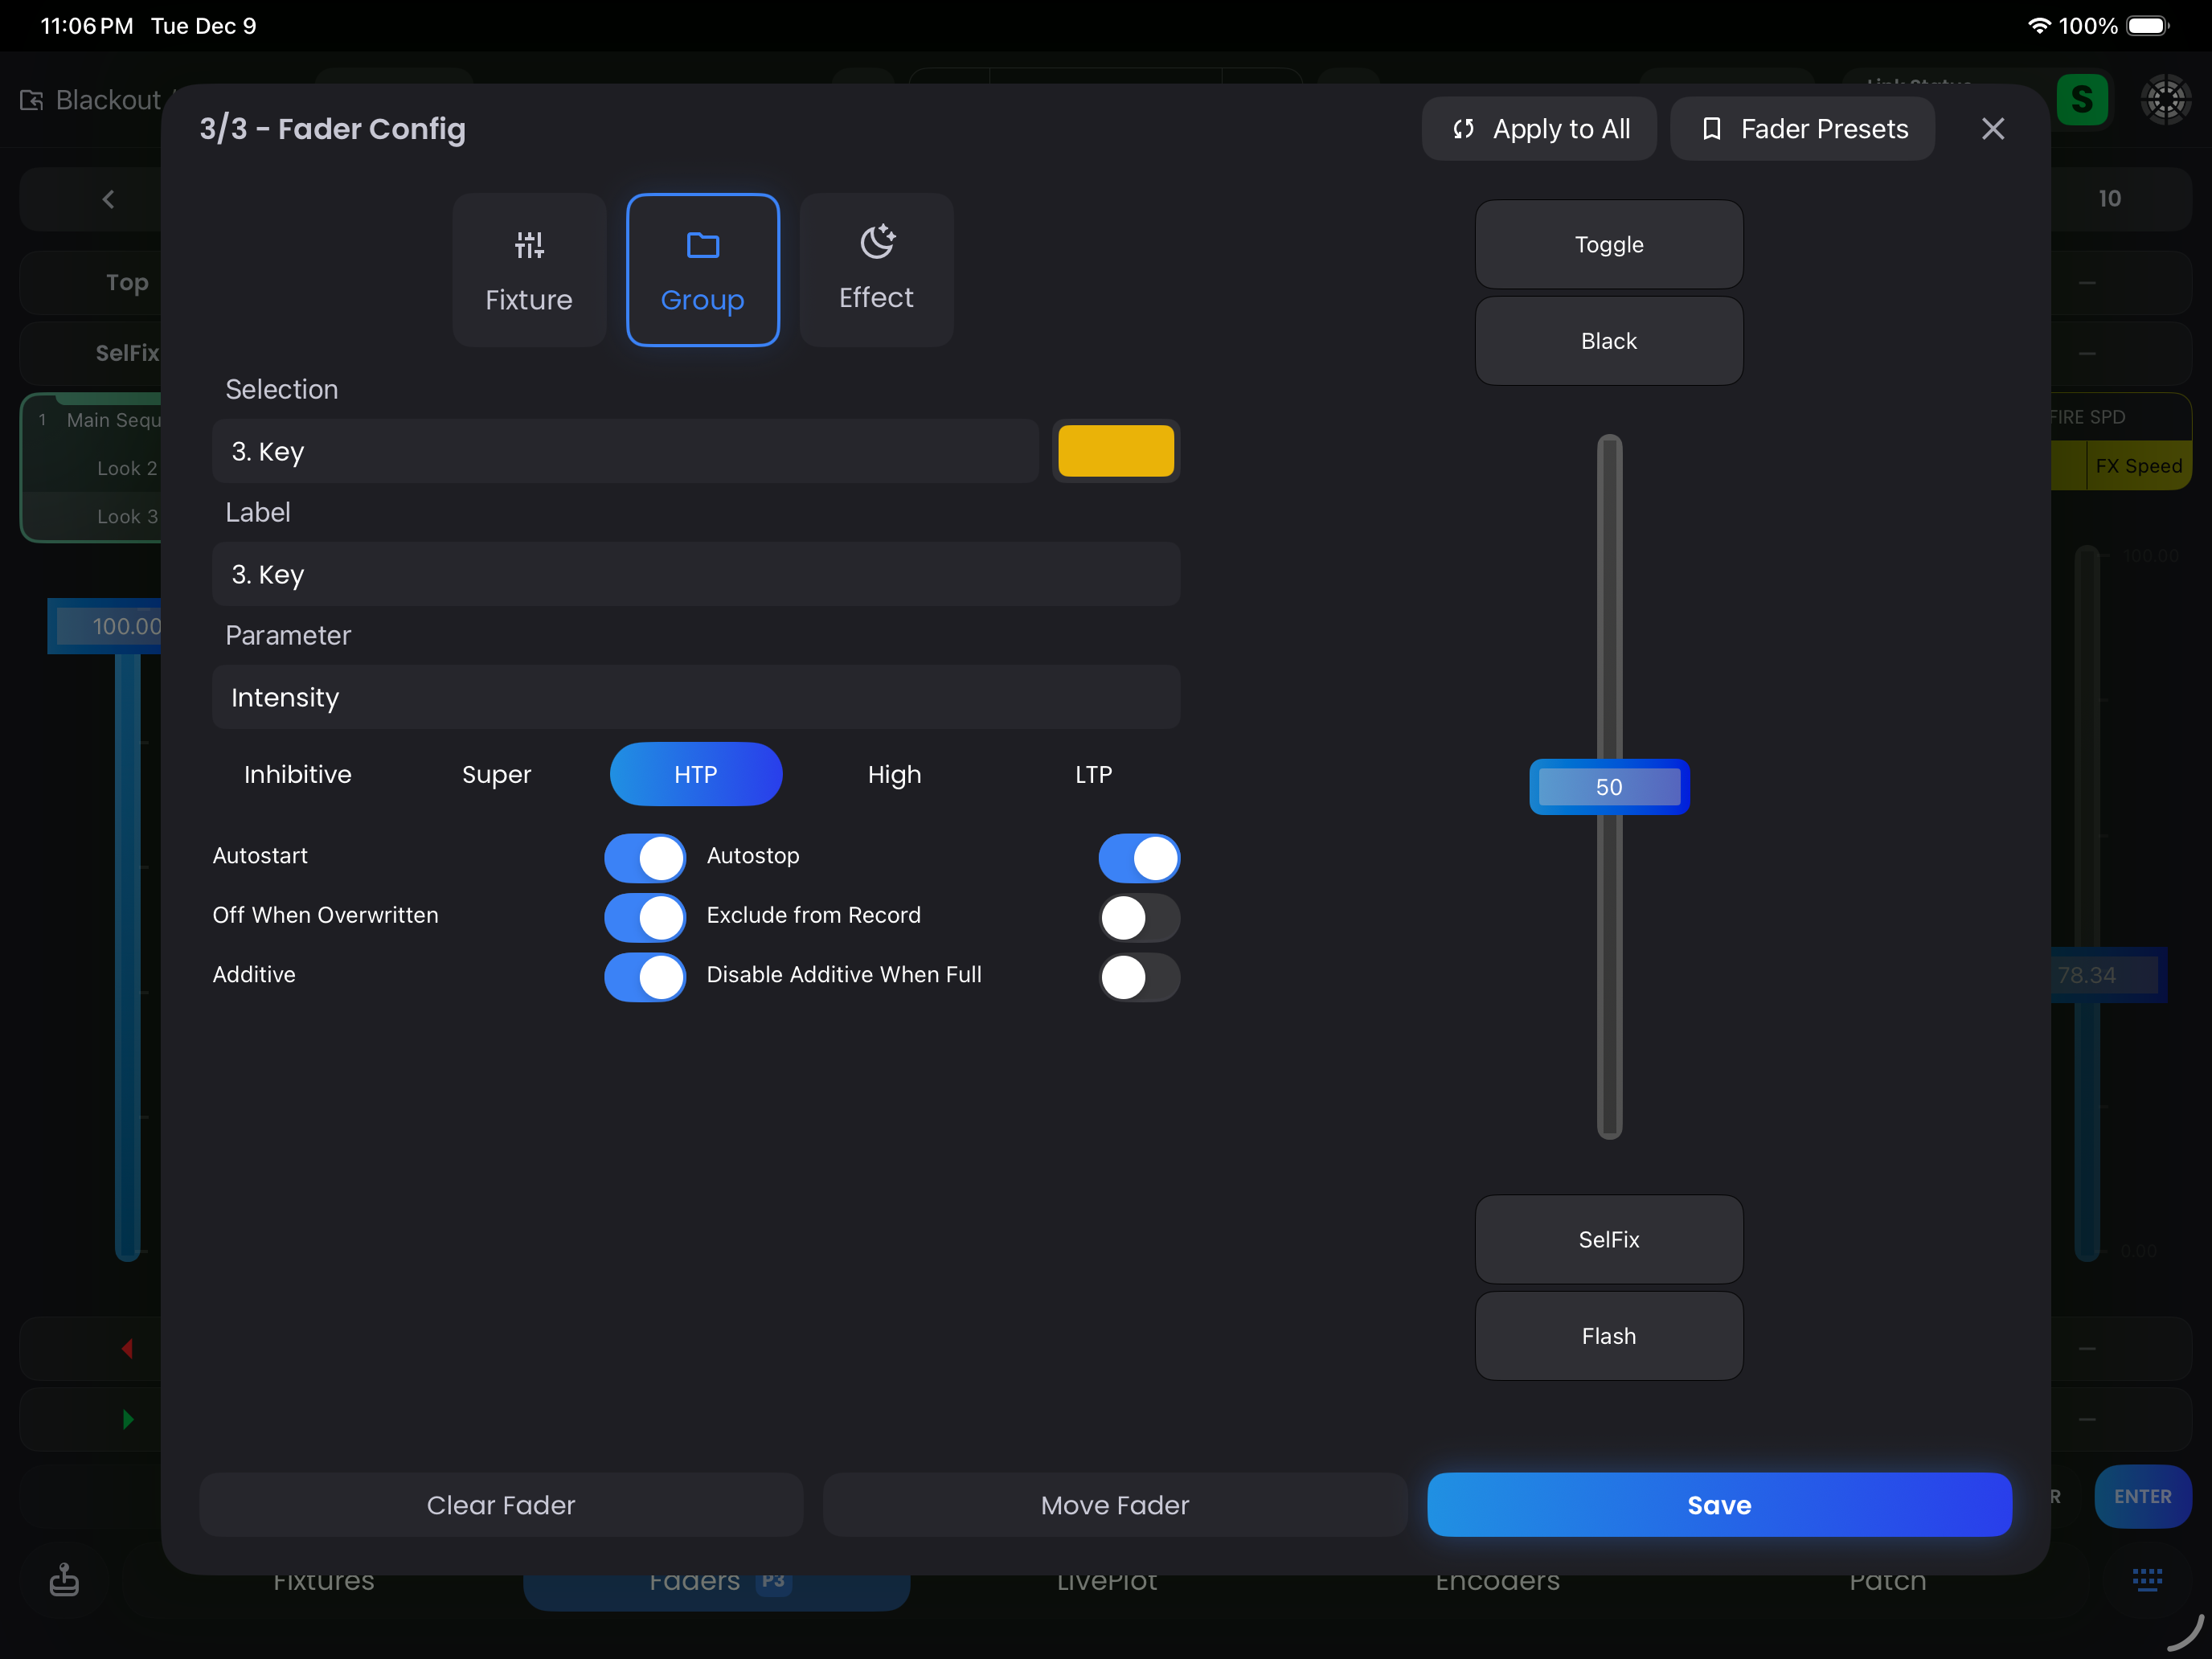
- Selection - select the specific Fixture or Group to load into this Fader (ie. Fixture 101)
- palette Color Swatch - Choose a color for this Fader to display
- Label - Custom name for the Fader
- Parameter (Default: Intensity) - choose the Parameter you wish to control
- Priority - select a priority (see Fader Priorities)
- Additional Options - see table below
Additional Fader Options
- Autostart (Default ON) - Turns the Fader ON when brought up from 0.
- Autostop (Default ON, OFF for Super priority) - Turns the Fader OFF when brought down to 0. Super priority faders default to OFF to maintain control.
- Off When Overwritten (Default ON) - When ON, higher priority faders will turn off this Fader when they take control of the same parameters. When OFF, this Fader remains active and will resume control when higher priority faders are turned off.
- Exclude From Record (Default OFF) - Prevents the Fader output from being recorded.
- Additive (Default ON) - Enables additive control, where multiple Faders can cumulatively affect a parameter, seamlessly transferring the value from control to control. If disabled, the Fader will snap to the value the Fader is affecting.
- Disable Additive When Full (Default OFF, ON for Super priority) - This is most used with SUPER priority Faders. This disables the additive effect when the Fader reaches its full value meaning once the Fader hits the top, it takes full control of the parameters for those Fixture(s). Nothing else can modify those parameters, not even manual values from the keypad.
Effect Faders
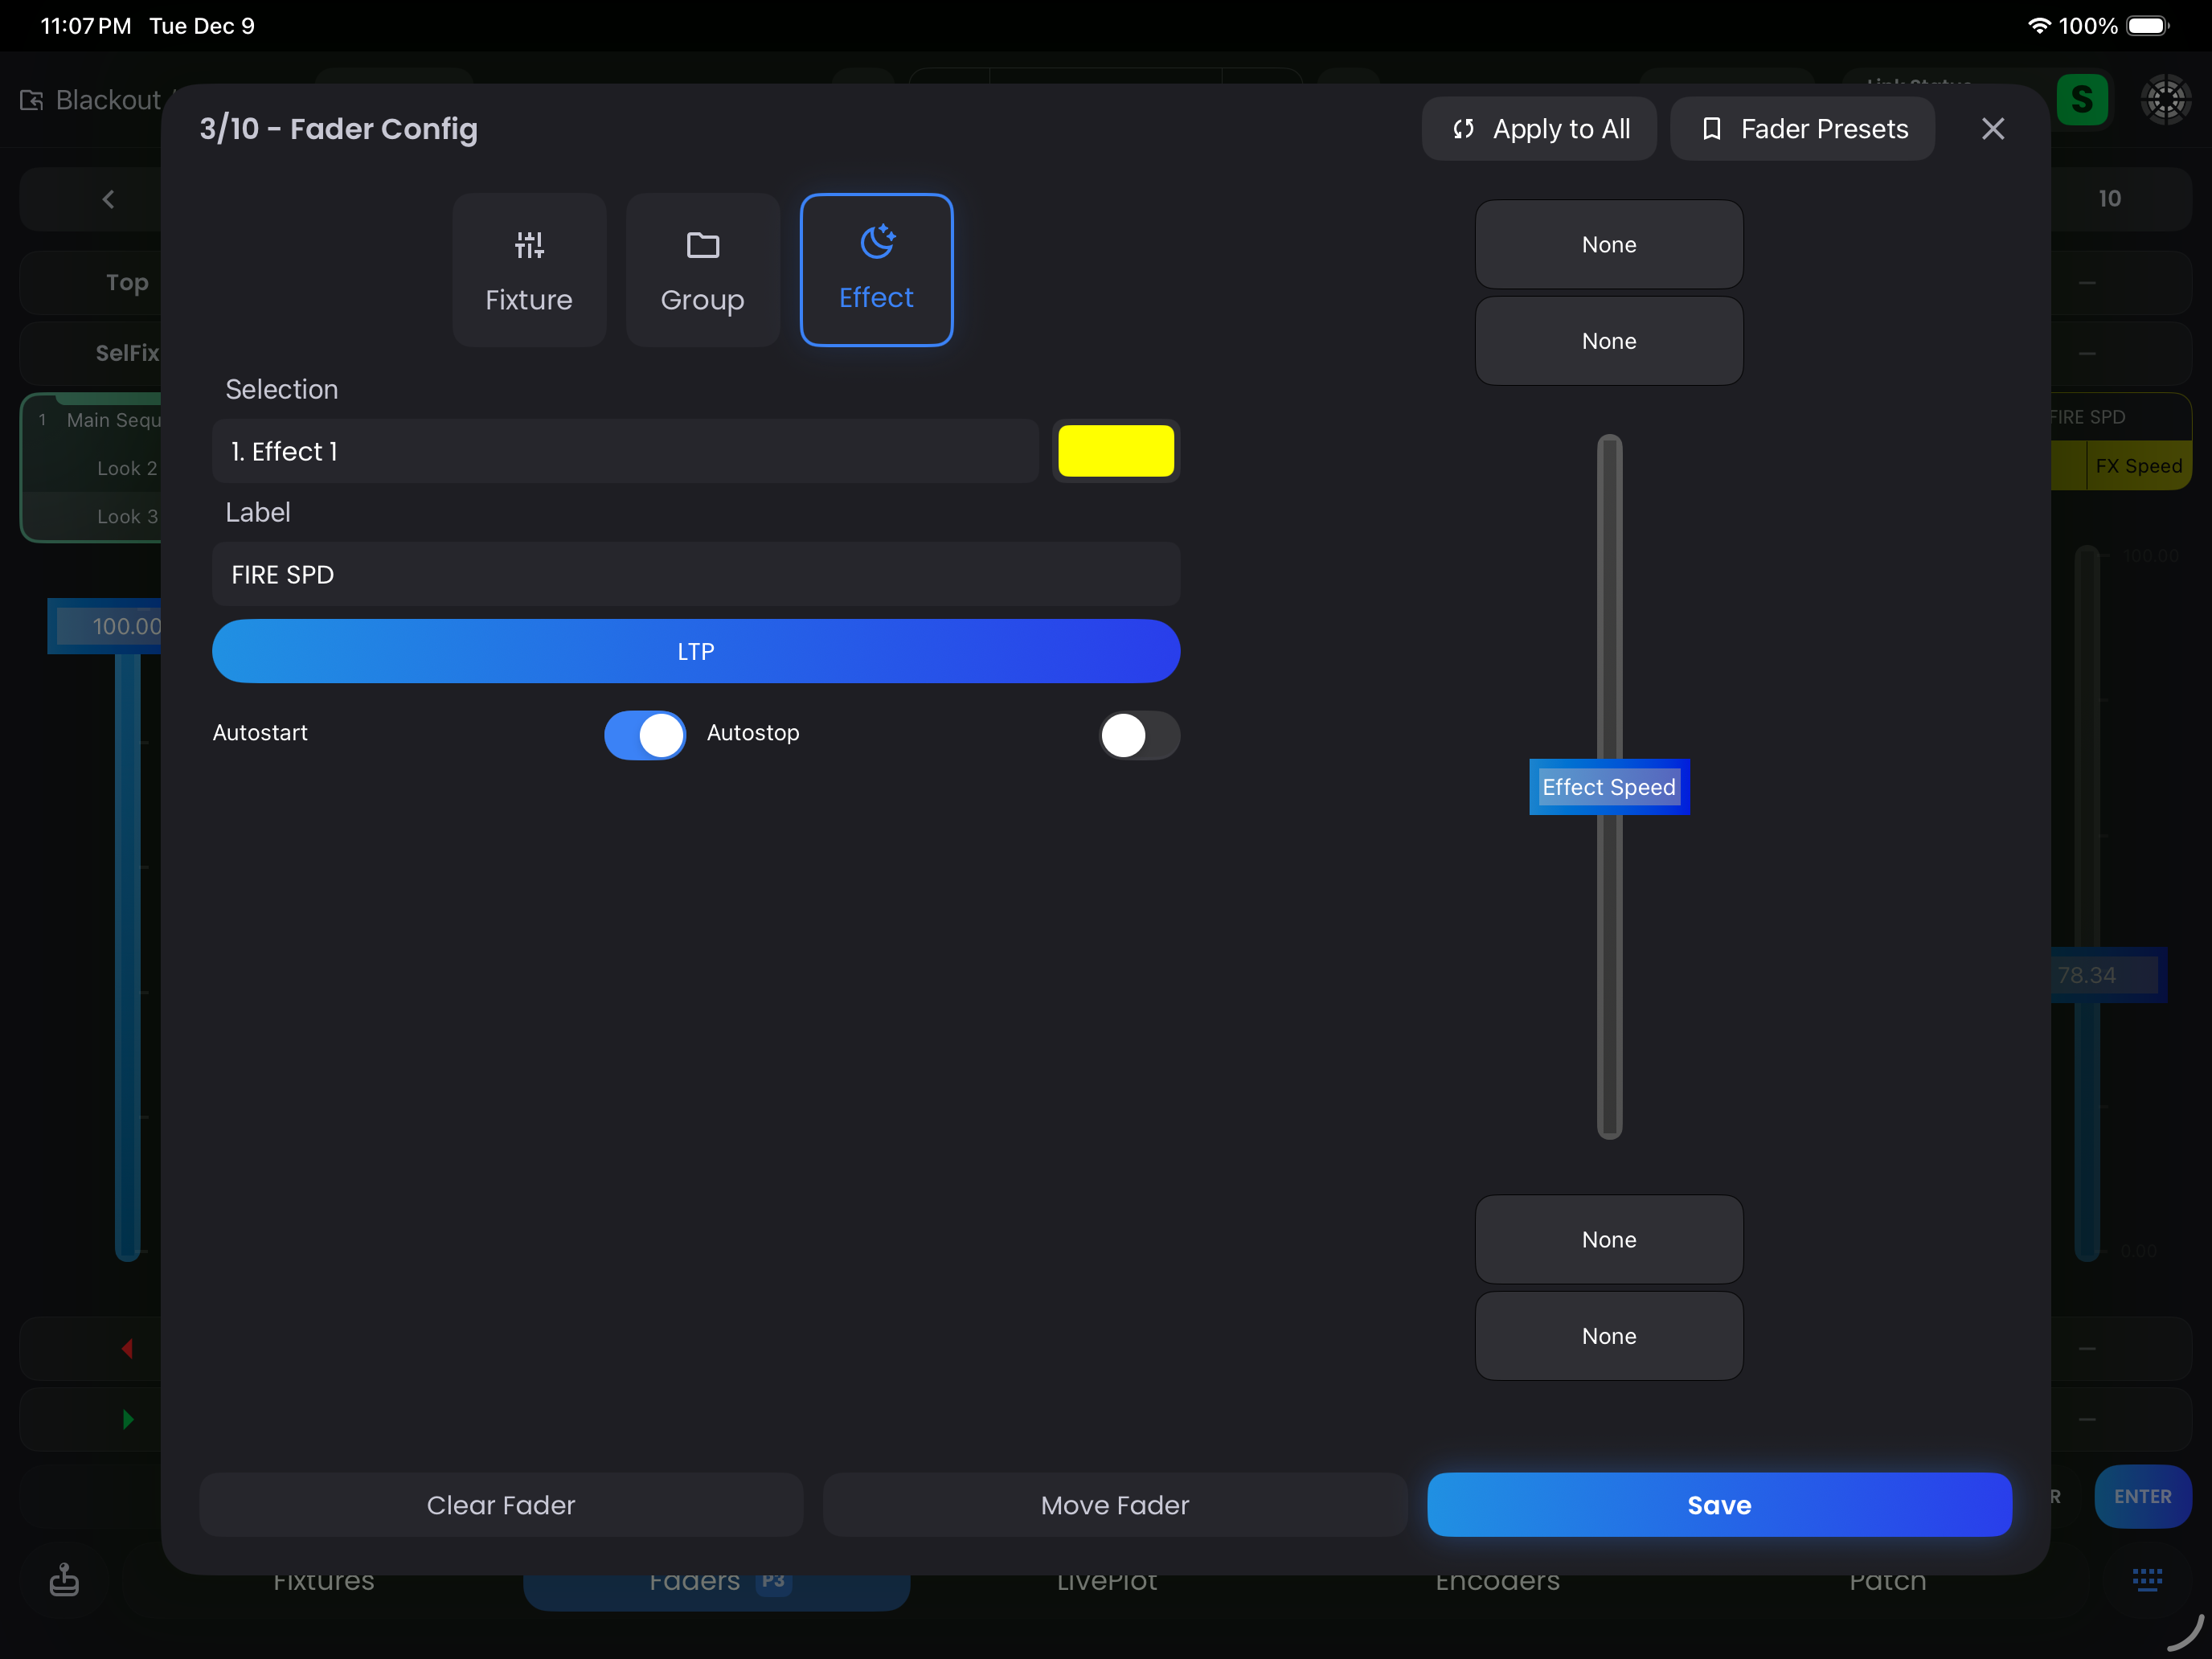
- Selection - select the specific Effect to load into this Fader (ie. Effect 1)
- palette Color Swatch - Choose a color for this Fader to display
- Label - Custom name for the Fader
- Additional Options - see table below
Additional Fader Options
- Autostart (Default ON) - Turns the Fader ON when brought up from 0.
- Autostop (Default OFF) - Turns the Fader OFF when brought down to 0.
WARNING
Effects live on their own layer in the priority hierarchy (positioned above Super priority faders). See Priority Hierarchy for complete details.
Sequence Faders
Sequence Faders are assigned when you create a new Sequence. Blackout starts you in 1. Main Sequence which is assigned to Fader 1 on Page 1. Whatever you record in a new Sequence (which could be anything from a single Fixture's intensity to an entire Look with Effects playing) will be assigned the next available Fader spot.
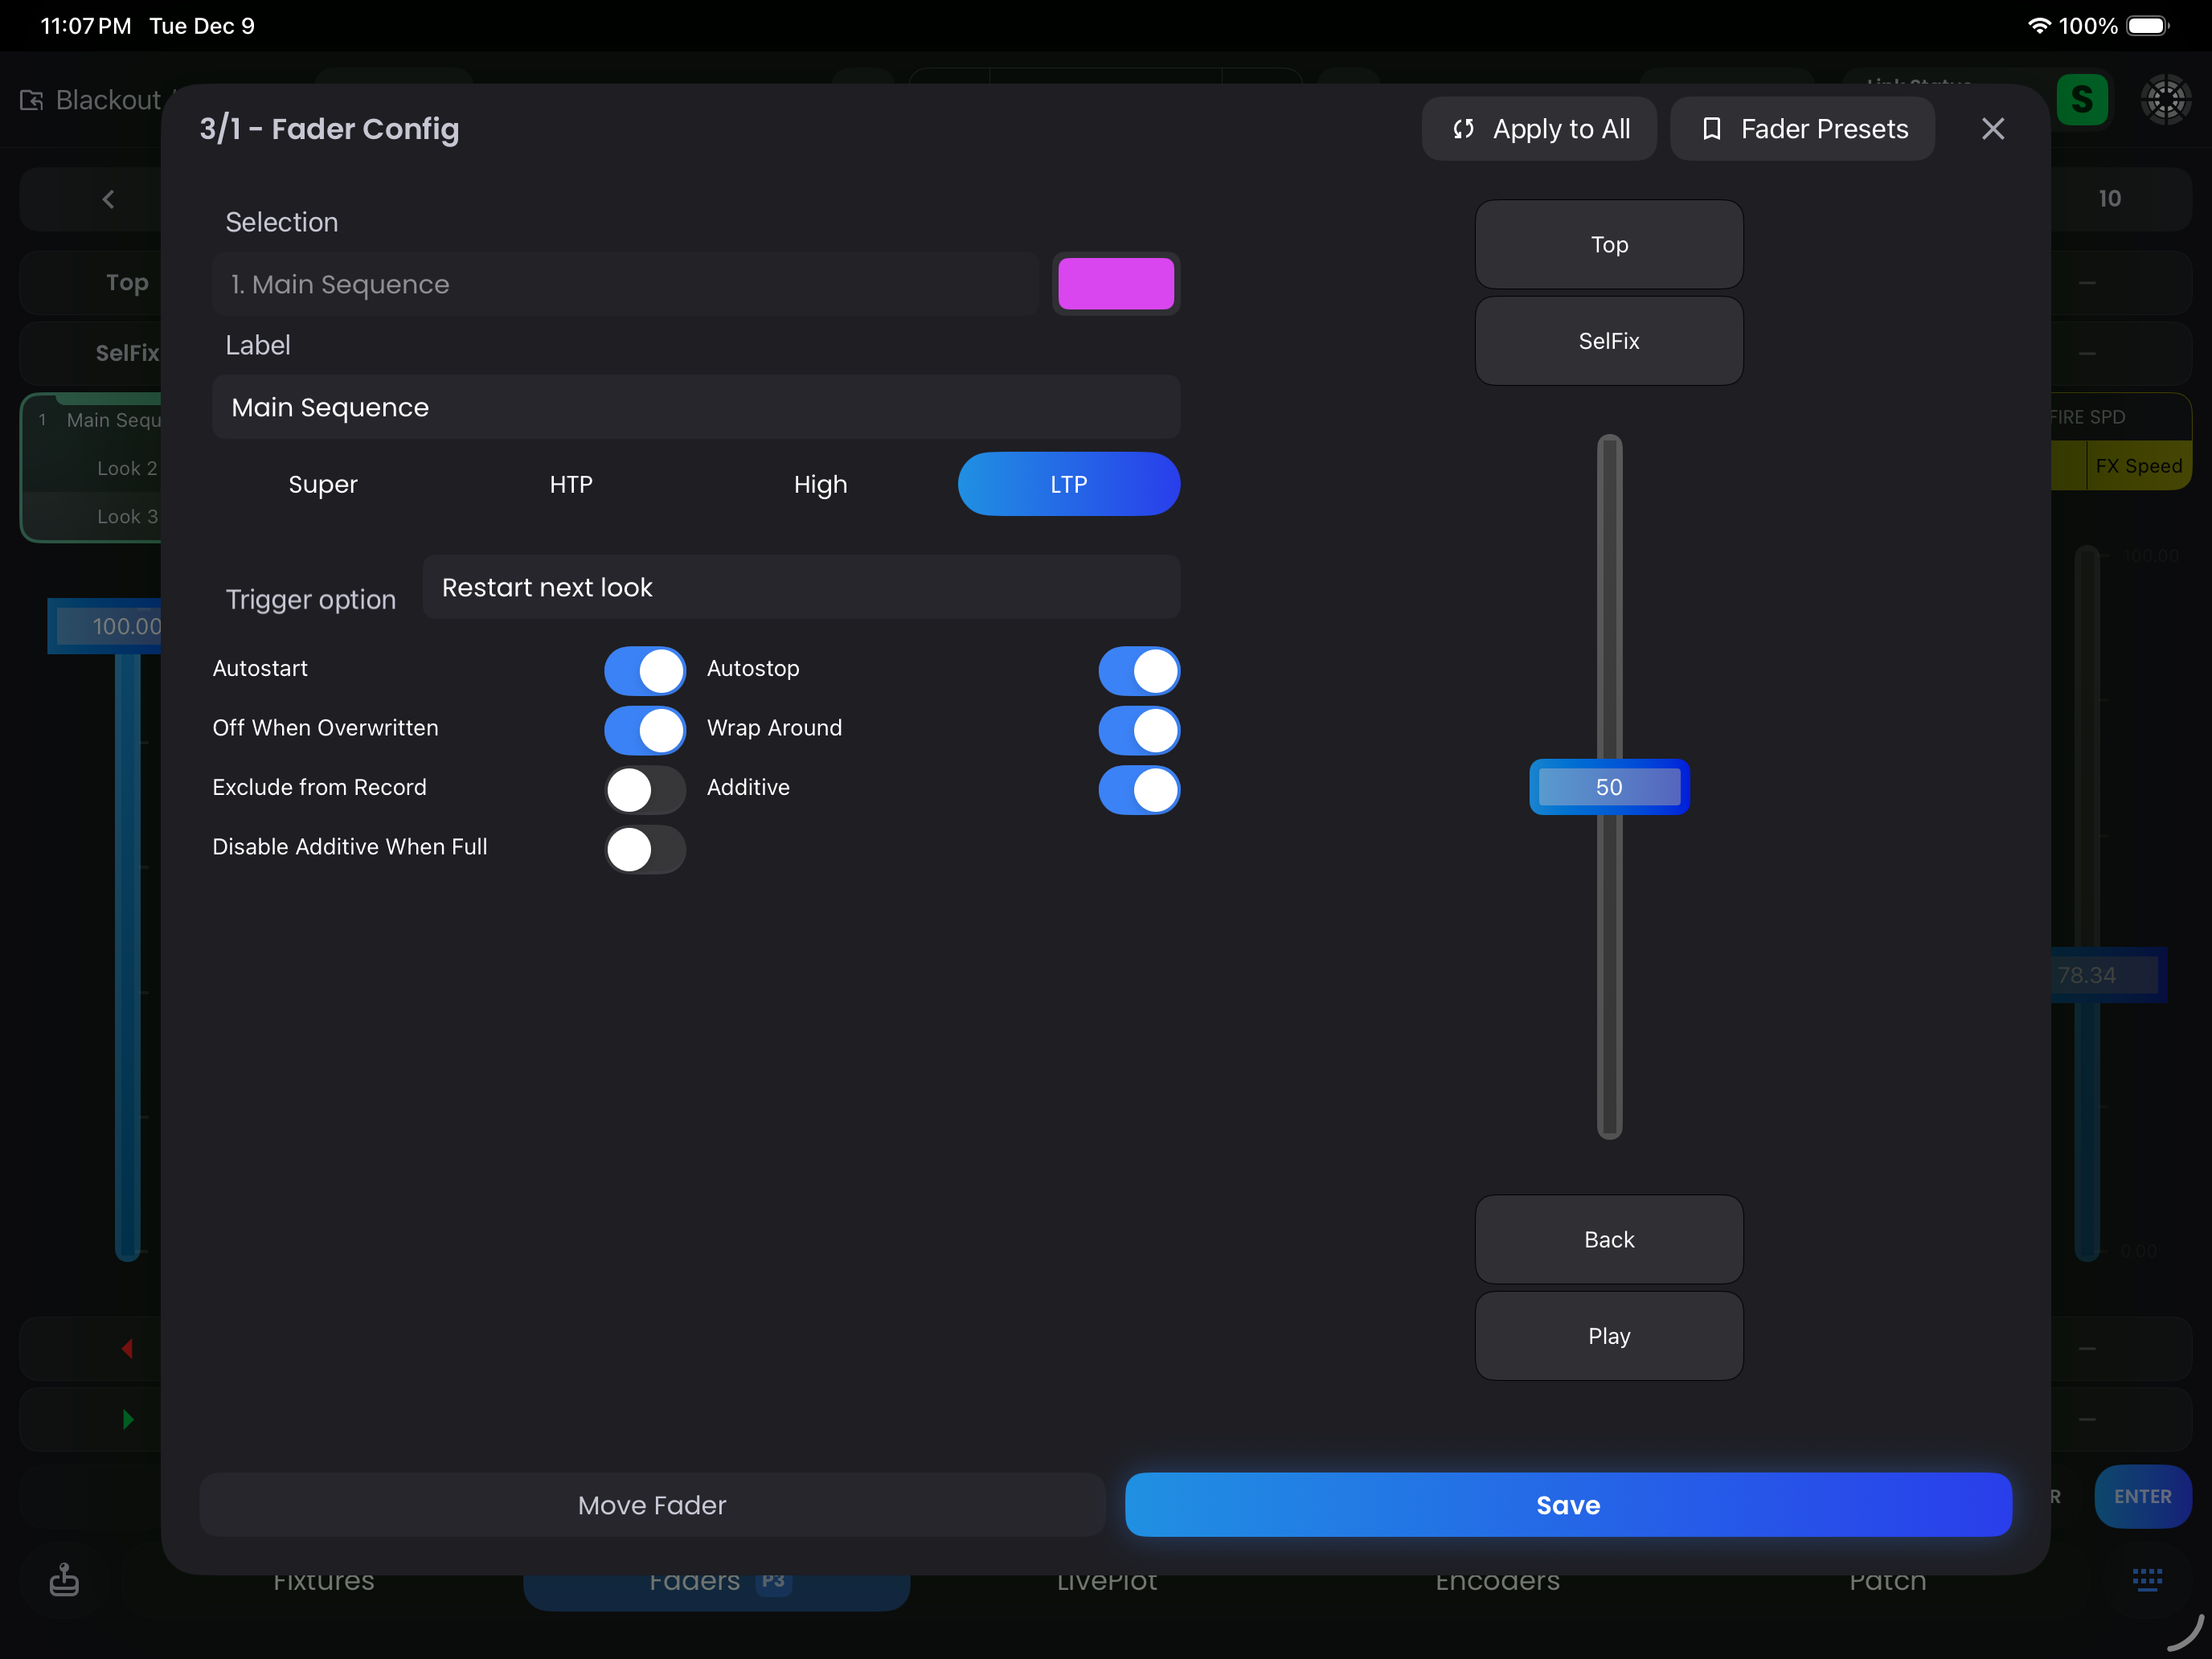
- Selection - select the specific Fixture or Group to load into this Fader (ie. Fixture 101)
- palette Color Swatch - Choose a color for this Fader to display
- Label - Custom name for the Fader
- Parameter (Default: Intensity) - choose the Parameter you wish to control
- Priority - select a priority (see Fader Priorities)
- Additional Options - see table below
Additional Fader Options
- Autostart (Default ON) - Turns the Fader ON when brought up from 0.
- Autostop (Default ON, OFF for Super priority) - Turns the Fader OFF when brought down to 0. Super priority faders default to OFF to maintain control.
- Off When Overwritten (Default ON) - When ON, higher priority faders will turn off this Fader when they take control of the same parameters. When OFF, this Fader remains active and will resume control when higher priority faders are turned off.
- Wrap Around (Default ON) - Enables the Sequence to loop back to the first Look when the GO command is executed after reaching the Sequence's last Look
- Exclude From Record (Default OFF) - Prevents the Fader output from being recorded.
- Additive (Default ON) - Enables additive control, where multiple Faders can cumulatively affect a parameter, seamlessly transferring the value from control to control. If disabled, the Fader will snap to the value the Fader is affecting.
- Disable Additive When Full (Default OFF, ON for Super priority) - This is most used with SUPER priority Faders. This disables the additive effect when the Fader reaches its full value meaning once the Fader hits the top, it takes full control of the parameters for those Fixture(s). Nothing else can modify those parameters, not even manual values from the keypad.
Fader Priorities
When configuring a fader, you can select from these priority levels. Each priority determines how the fader interacts with other controls in the system. For a complete understanding of how these priorities interact, see the Priority Hierarchy page.

LTP (Latest Takes Precedence) - Default
- Most recent adjustment takes control
- Standard mode for handling conflicting control inputs
- Always used for non-intensity parameters like color, gobo, or effects
- Best for: General playback and programming
High
- One step above default LTP
- Cannot be overwritten by standard LTP faders
- Useful when you need one control to take precedence over standard playback
HTP (Highest Takes Precedence)
- For intensity parameters only, the highest value from any control source is used
- Other parameters (color, position) still use LTP behavior
- Good for traditional intensity control where multiple sources might control the same fixtures
- Best for: Intensity-based busking where you want the brightest value to win
Super
- Default settings: Autostop is OFF, Disable Additive When Full is ON
- Cannot override Effects or Inhibitive faders, but overrides everything below
- Command line cannot override Super priority faders
- Best for: Critical adjustments you don't want affected by anything else
Inhibitive
- Sets a ceiling/maximum value that other controls cannot exceed
- Two modes available:
- Absolute: Sets a hard maximum ceiling
- Example: Set to 50% intensity - no other fader or command can exceed 50%
- Relative: Limits output proportionally based on the fader position
- Example: At 50%, all fixture outputs are scaled to 50% of their current values
- Absolute: Sets a hard maximum ceiling
- Even Super priority faders and command line cannot override inhibitive limits
- Best for: Safety restrictions or venue limitations
Priority Guidelines
- Start with LTP for most faders unless you have a specific need
- Use Inhibitive sparingly - only when you need absolute limits (or use as a quick way to kill output to battery lights)
- Reserve Super priority for critical adjustments
For the complete priority hierarchy including Master Fader, Effects, Freeze, and Command Line, see Priority Hierarchy.
Button Types
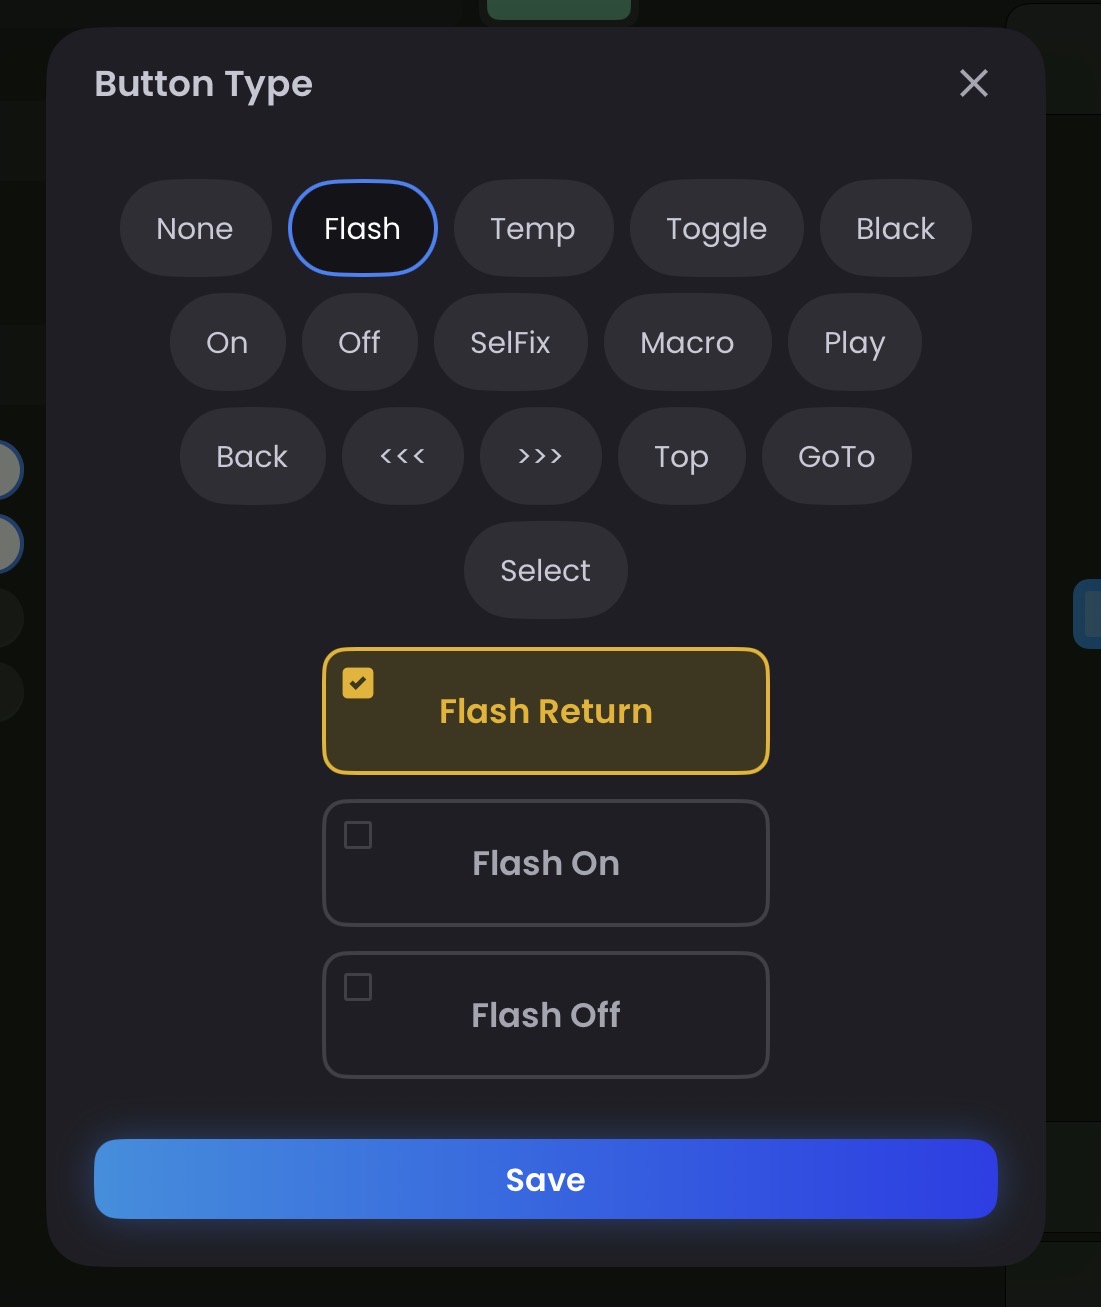
Fader buttons provide quick access to fader functions without moving the fader itself. To assign a button, press and hold either the empty button space or the fader's configuration button at the top.
Button Types
None - Empty button with no function
Flash - Temporarily brings the fader to 100% while pressed
- Three modes available:
- Flash Return: Returns to previous state when released (on/off and position)
- Flash On: Fader stays on when released
- Flash Off: Fader turns off when released
- Three modes available:
Temp (Temporary) - Activates the fader for a predefined duration with customizable timing
- Up Time: Transition time to reach 100%
- Down Time: Transition time to return to previous value
- Hold Time: Two modes:
- Auto: Automatically transitions down after specified wait time
- Manual: Requires second tap to transition back down
Toggle - Switches the fader on or off with each press (same as double-tapping the fader). Fader position doesn't move.
Black - Reverse of Flash - temporarily brings fader to 0% while pressed. Returns to previous state when released.
On - Turns the fader on
Off - Turns the fader off
Selfix (Select Fixtures) - Selects all fixtures that have data within the fader. Works for all fader types (Fixture, Group, Effect, Sequence). Helpful to quickly grab a selection for programming.
Macro (Coming Soon) - Will allow triggering a macro from this button
Play (Sequence Faders only) - Plays through looks chronologically with respect to look timing. Auto-assigned to sequence faders by default.
Back (Sequence Faders only) - Reverses through looks chronologically. Auto-assigned to sequence faders by default. Can use look timing if enabled in Settings → Default Back Button Behavior
Fast Back (Sequence Faders only) - Like Back but ignores look timing. Quickly reverses through looks.
Fast Forward (Sequence Faders only) - Like Play but ignores look timing. Quickly cycles through looks.
Top (Sequence Faders only) - Jumps to first look in sequence with respect to timing
Go To (Sequence Faders only) - Opens list to select which look to jump to. Respects look timing when transitioning.
Select (Sequence Faders only) - Switches active sequence (indicated by bar above fader). Useful when mapped to external hardware for quickly switching between sequences to update looks.
Speed 1:1 (Effect Faders set to Effect Speed only) - This resets the Effect Speed to 100%.
TIP
Sequence Faders are automatically assigned Play and Back buttons by default. You can customize these or replace them with any other button type.
Moving a Fader
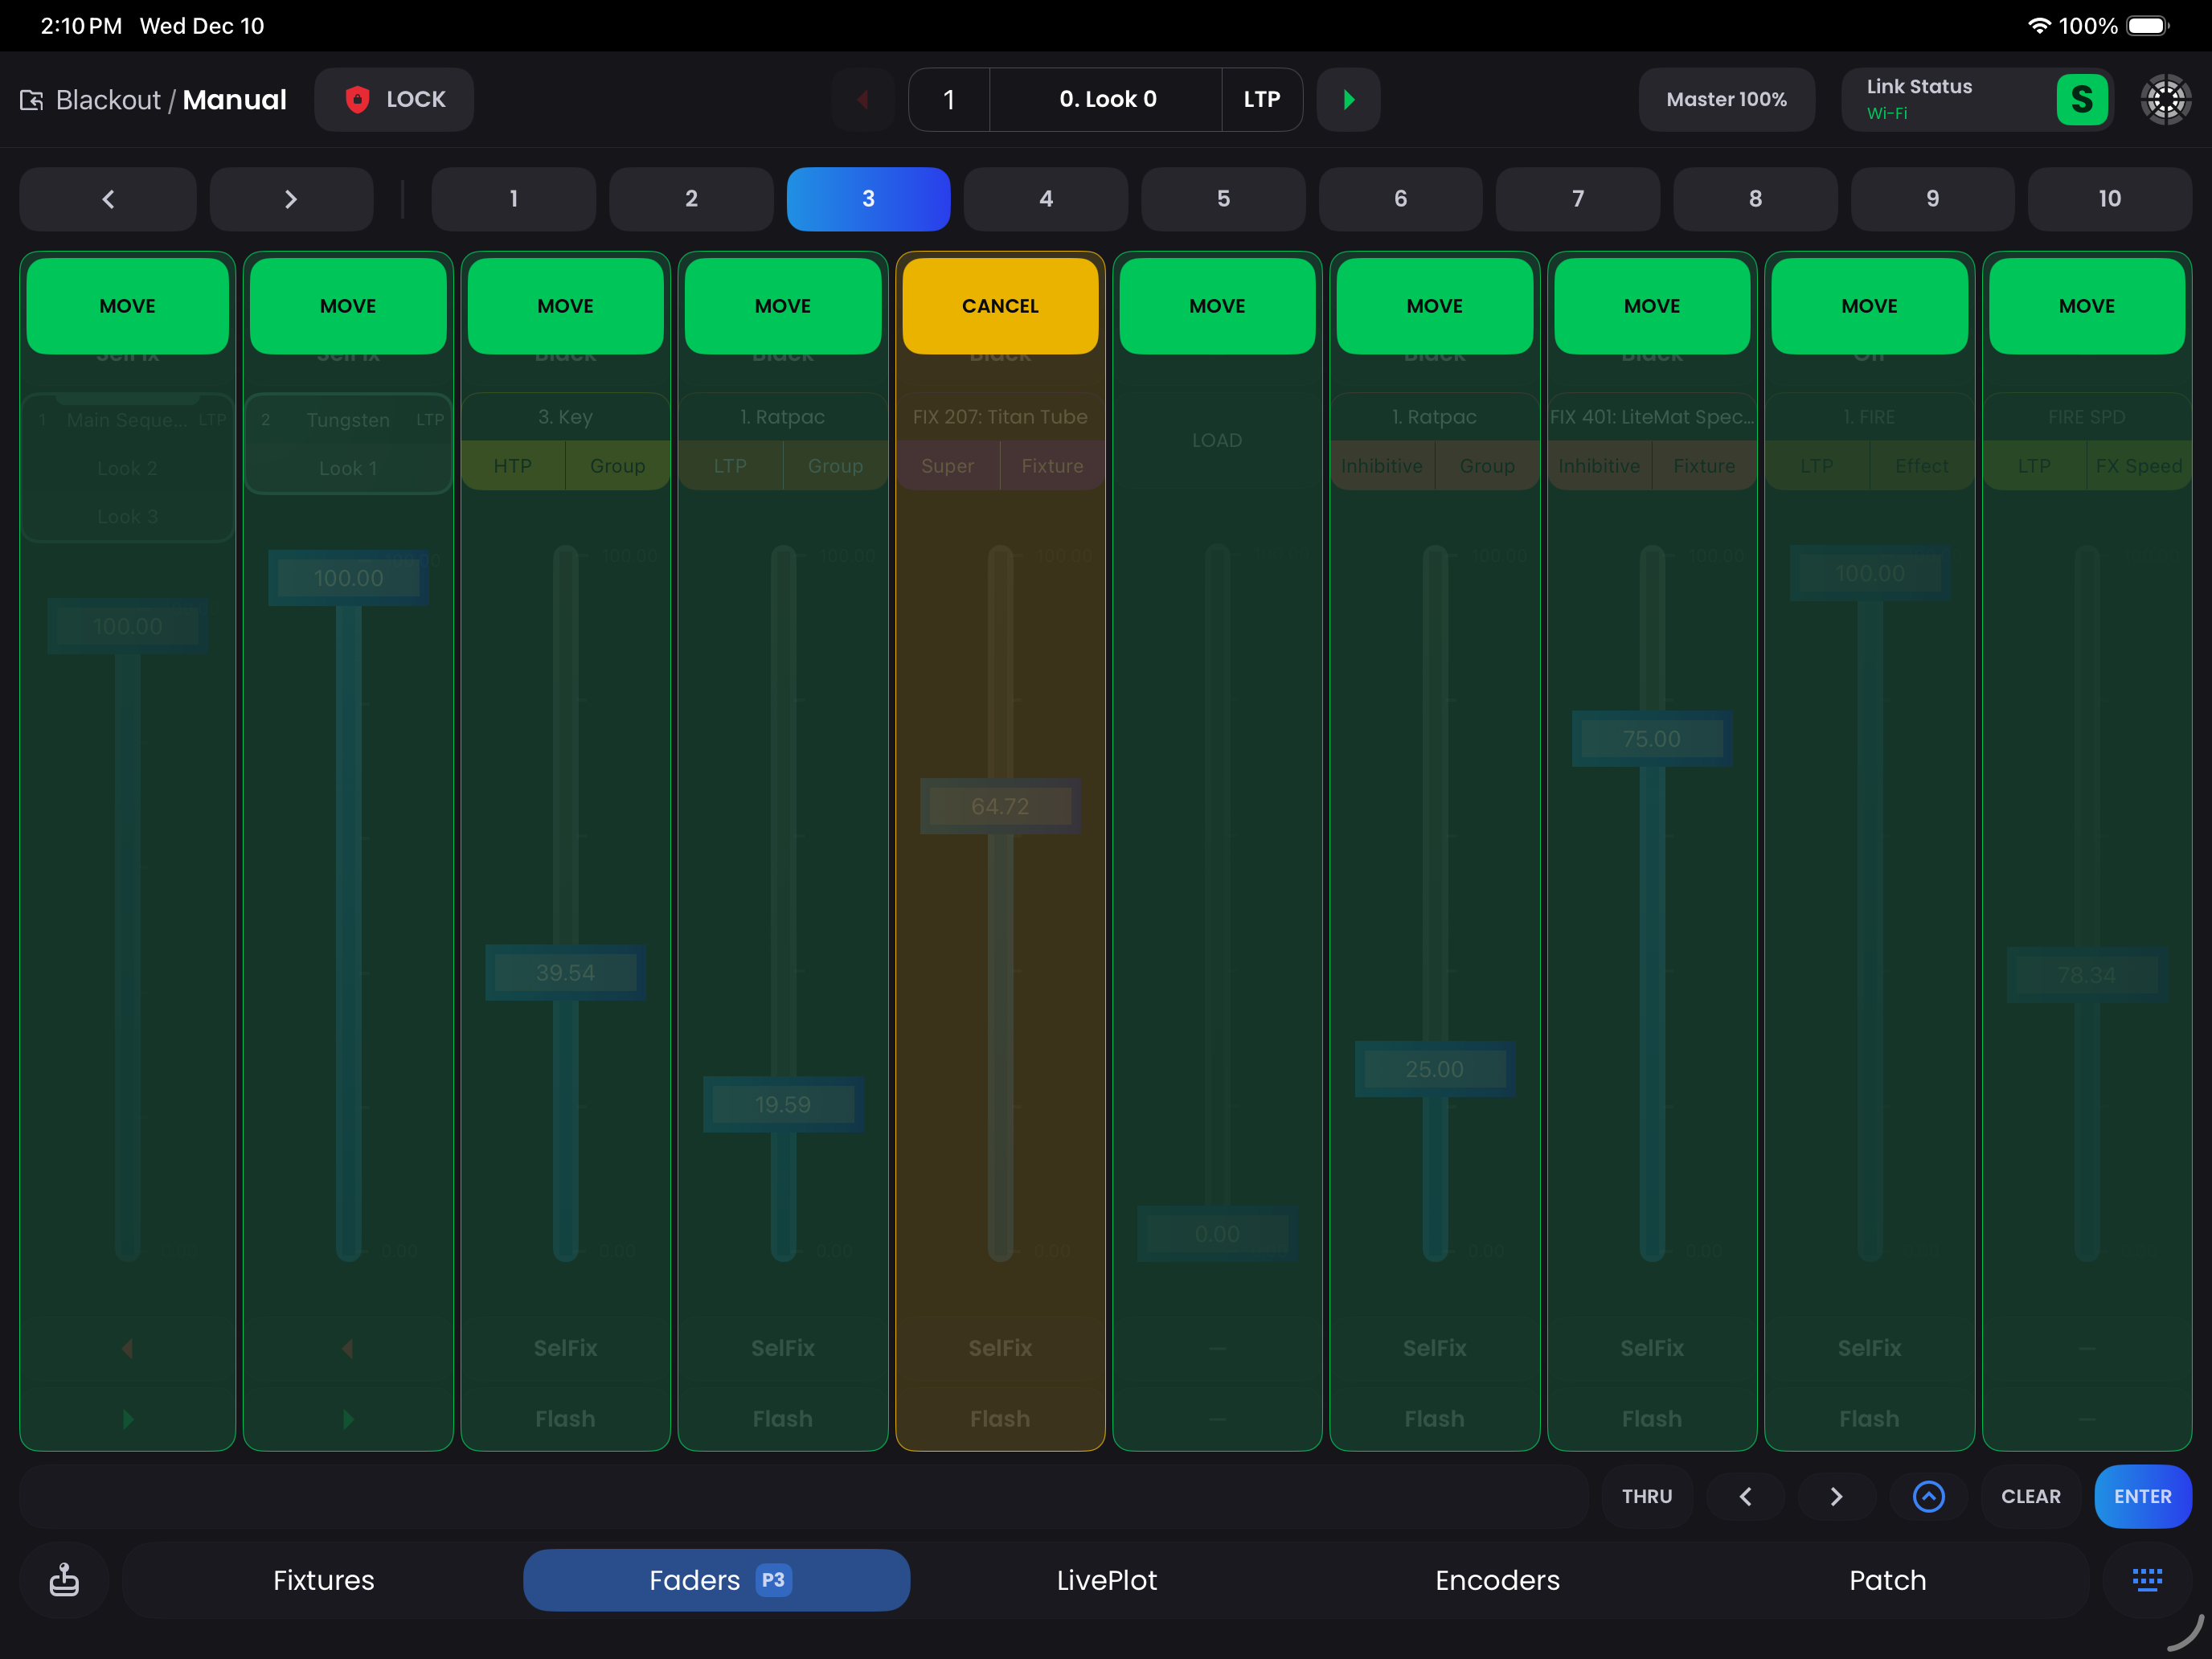
To move a fader, simply open up the fader config and tap the Move button at the bottom of the popup. You will then be taken back to the fader page where you can tap to move the fader to any available spot marked in green.
Deleting a Fader
To delete a fader, simply hold its LOAD button at the top of the Fader to open up the Fader Configuration popup. Then press Clear Fader in the bottom left corner. You will get a confirmation message before this destructive action.
WARNING
If this is a Sequence Fader the Sequence will also be deleted.
NOTE
1. Main Sequence cannot be deleted as a showfile must have at least one Sequence.