Connect to Astera
The Astera ART7 WiFi box integration allows Blackout to communicate directly with Astera fixtures using their proprietary wireless protocol. This provides access to Astera-specific features like battery monitoring, fixture settings, and quick pairing while still controlling the lights via DMX through CRMX.
Requirements
- Astera ART7 WiFi box with firmware 5.15.137 or later (check the back of your ART7 box to make sure it says ART7-WIFI on the sticker)
- Blackout app installed on your iPad
- AsteraNext App installed (for initial ART7 setup)
- Compatible CRMX transmitter (Cerise Pro, RatPac AKS/Satellite, Stardust, or use the ART7's built-in CRMX node)
FIRMWARE UPDATE REQUIRED
The ART7 requires custom Blackout firmware (5.15.137+). To update:
- Connect to ART7 via Bluetooth in the AsteraNext app
- Go to App Settings → Lights Background Update
- Press & hold the refresh icon → enter code
Blackout - Update when prompted and reboot the ART7
Connection Methods
Blackout supports two ways to connect to the ART7:
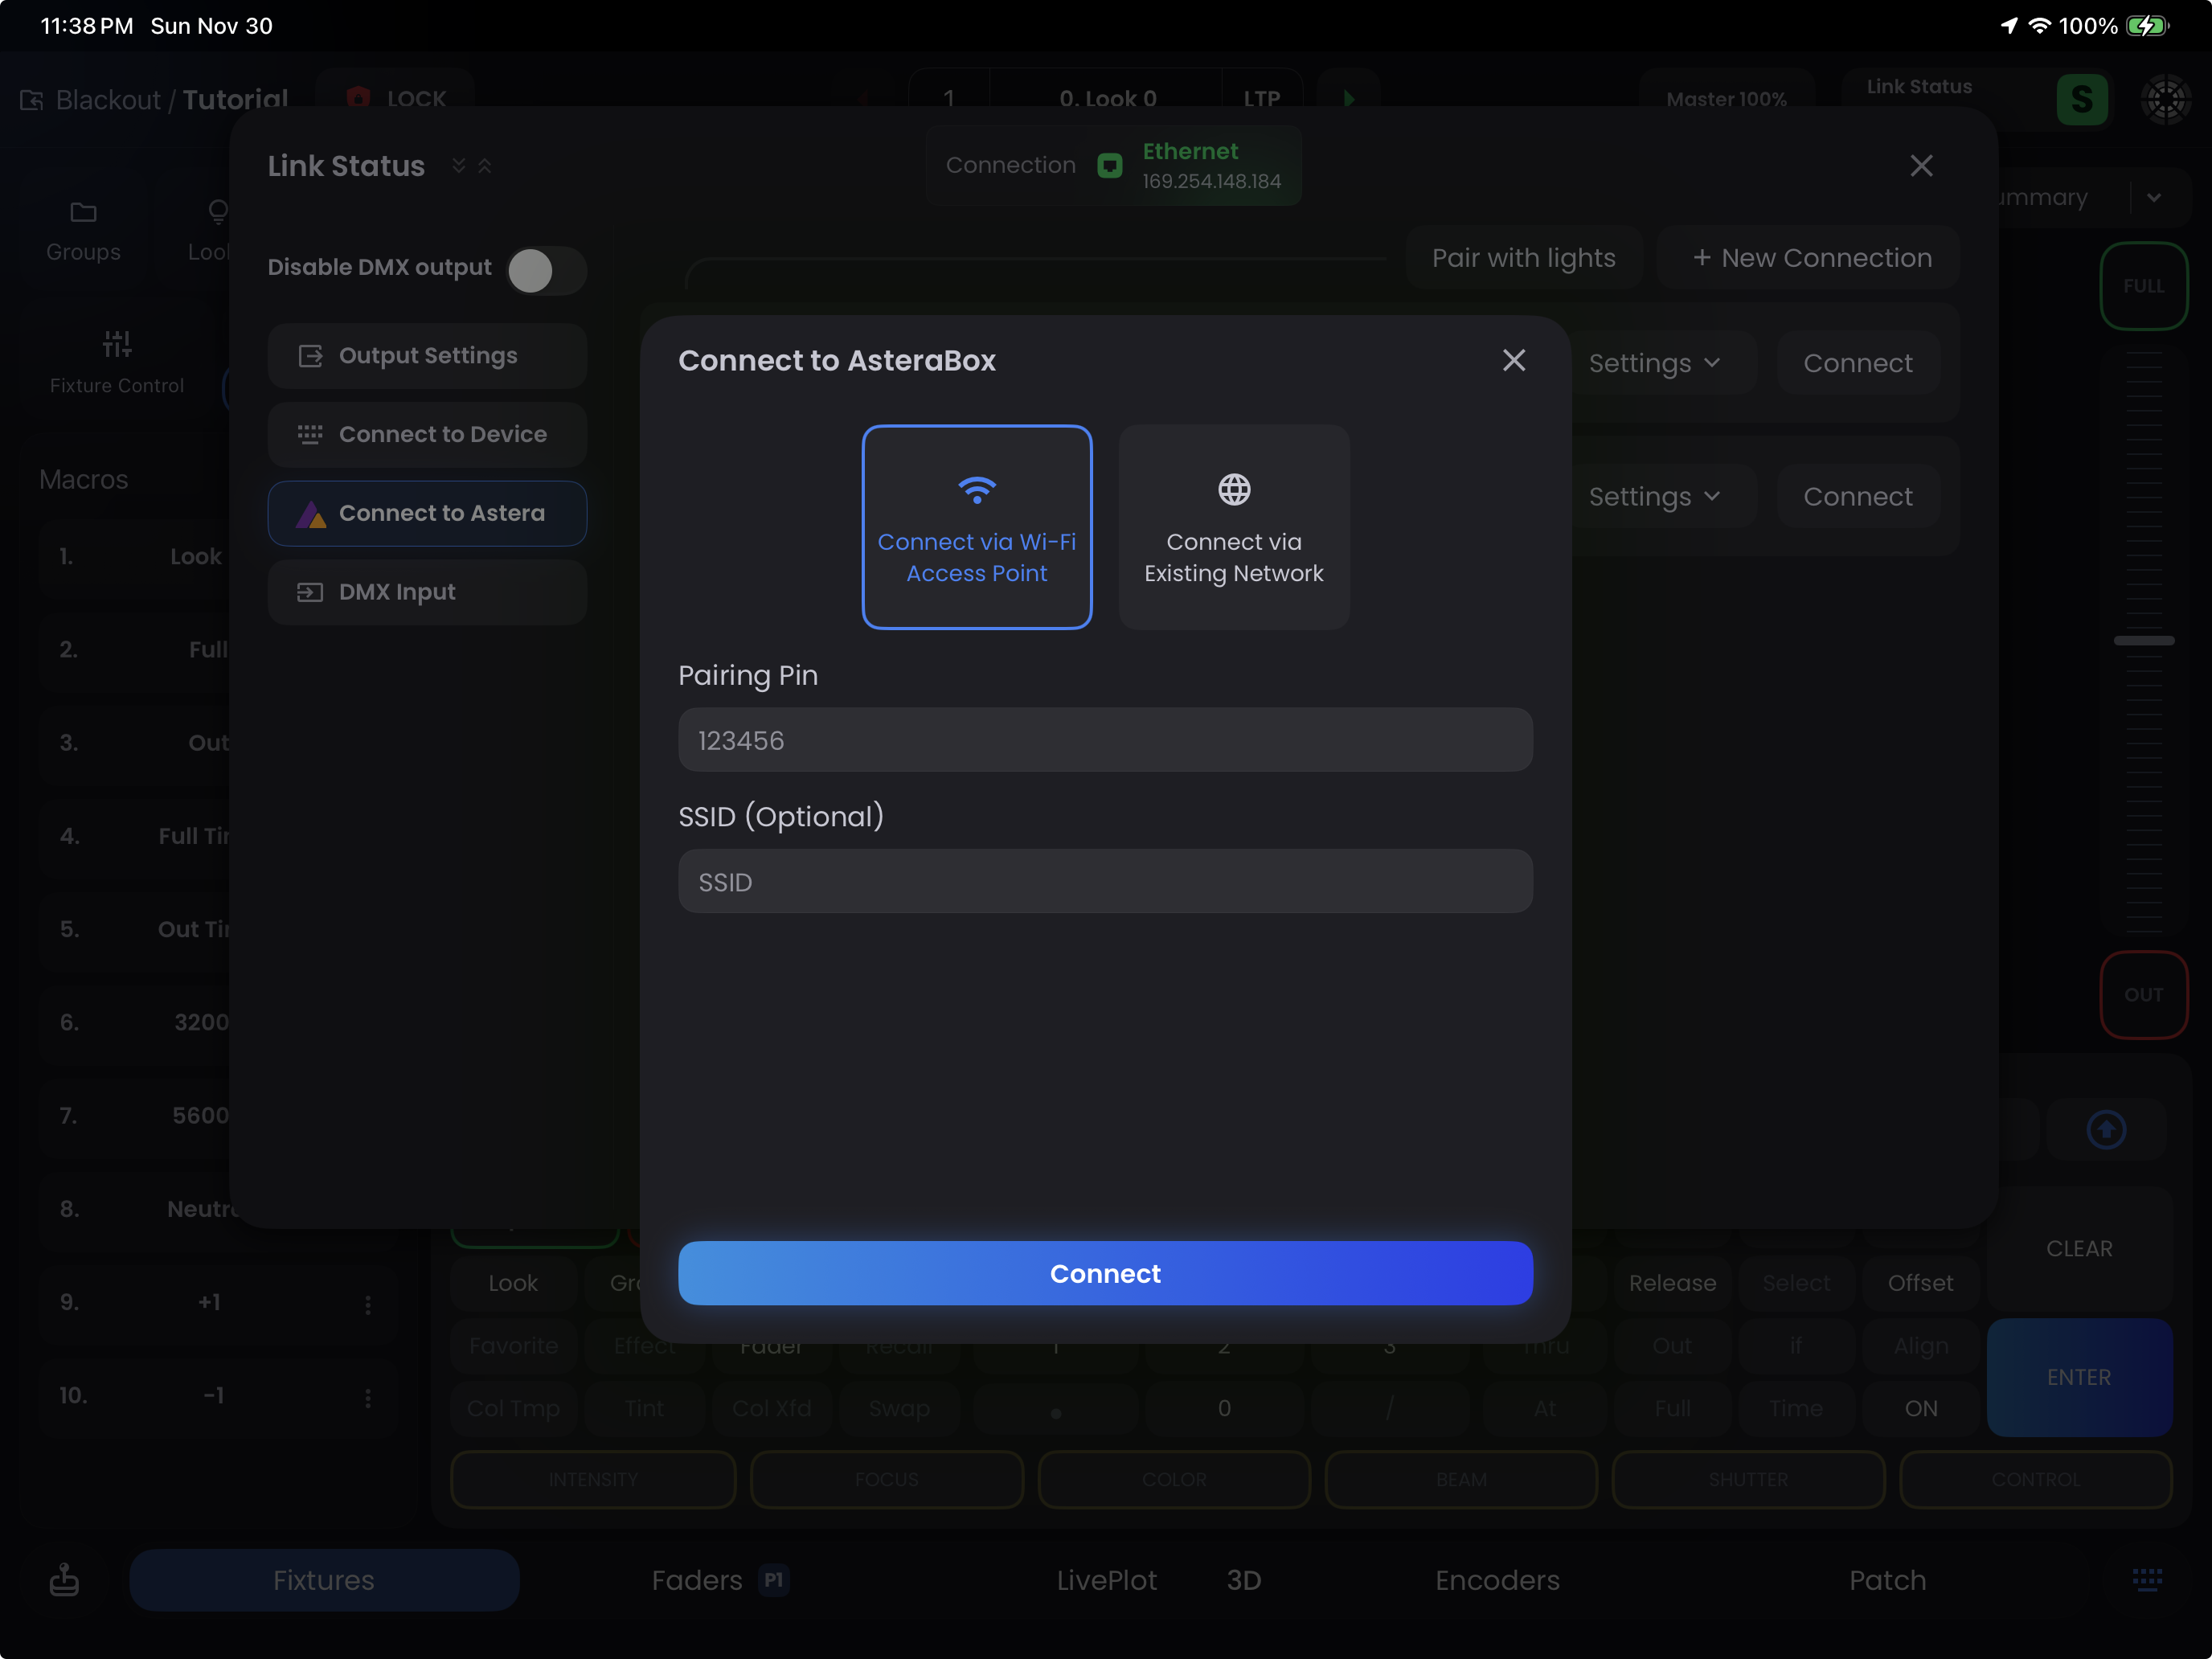
Wi-Fi Access Point (Simple)
The ART7 creates its own Wi-Fi network that your iPad connects to directly. This is the simplest setup for basic use.
Best for:
- Single operator workflows
- Small setups without existing network infrastructure
- Quick setup on location
Setup Steps:
Configure ART7 in AsteraNext app (via Bluetooth):
- Go to ART7 settings → Wi-Fi Settings
- Turn Access Point ON
- Turn Join Network OFF
- Save and reboot
Configure your primary transmitter (Cerise, AKS, etc.):
- Connect to iPad via USB-C or Ethernet
- In Safari, navigate to transmitter's IP address
- Set Default Gateway = NO (prevents conflicts with ART7)
- Configure other settings as needed
Connect in Blackout:
- Open Blackout → tap
Link Status - Tap
Connect to Astera→Add New Astera Box - Select Connect via Wi-Fi Access Point
- Enter the pairing PIN from ART7's back sticker
- Choose Radio PIN + Region → ART7 connects instantly
- Open Blackout → tap
Link fixtures to CRMX transmitter:
- In
Link Status→Connect to Astera, select your connected ART7 - Tap
List of Lights→ select all fixtures - Tap Unlink CRMX to clear previous links
- Press the Link button on your transmitter (or enable ART7's built-in CRMX node)
- Test control in Fixtures using the Fixture Controls Sidebar
- In
INFO
The ART7 has a built-in CRMX node. To use it instead of a separate transmitter, enable the node by tapping the CRMX button in the connected ART7 banner in Link Status
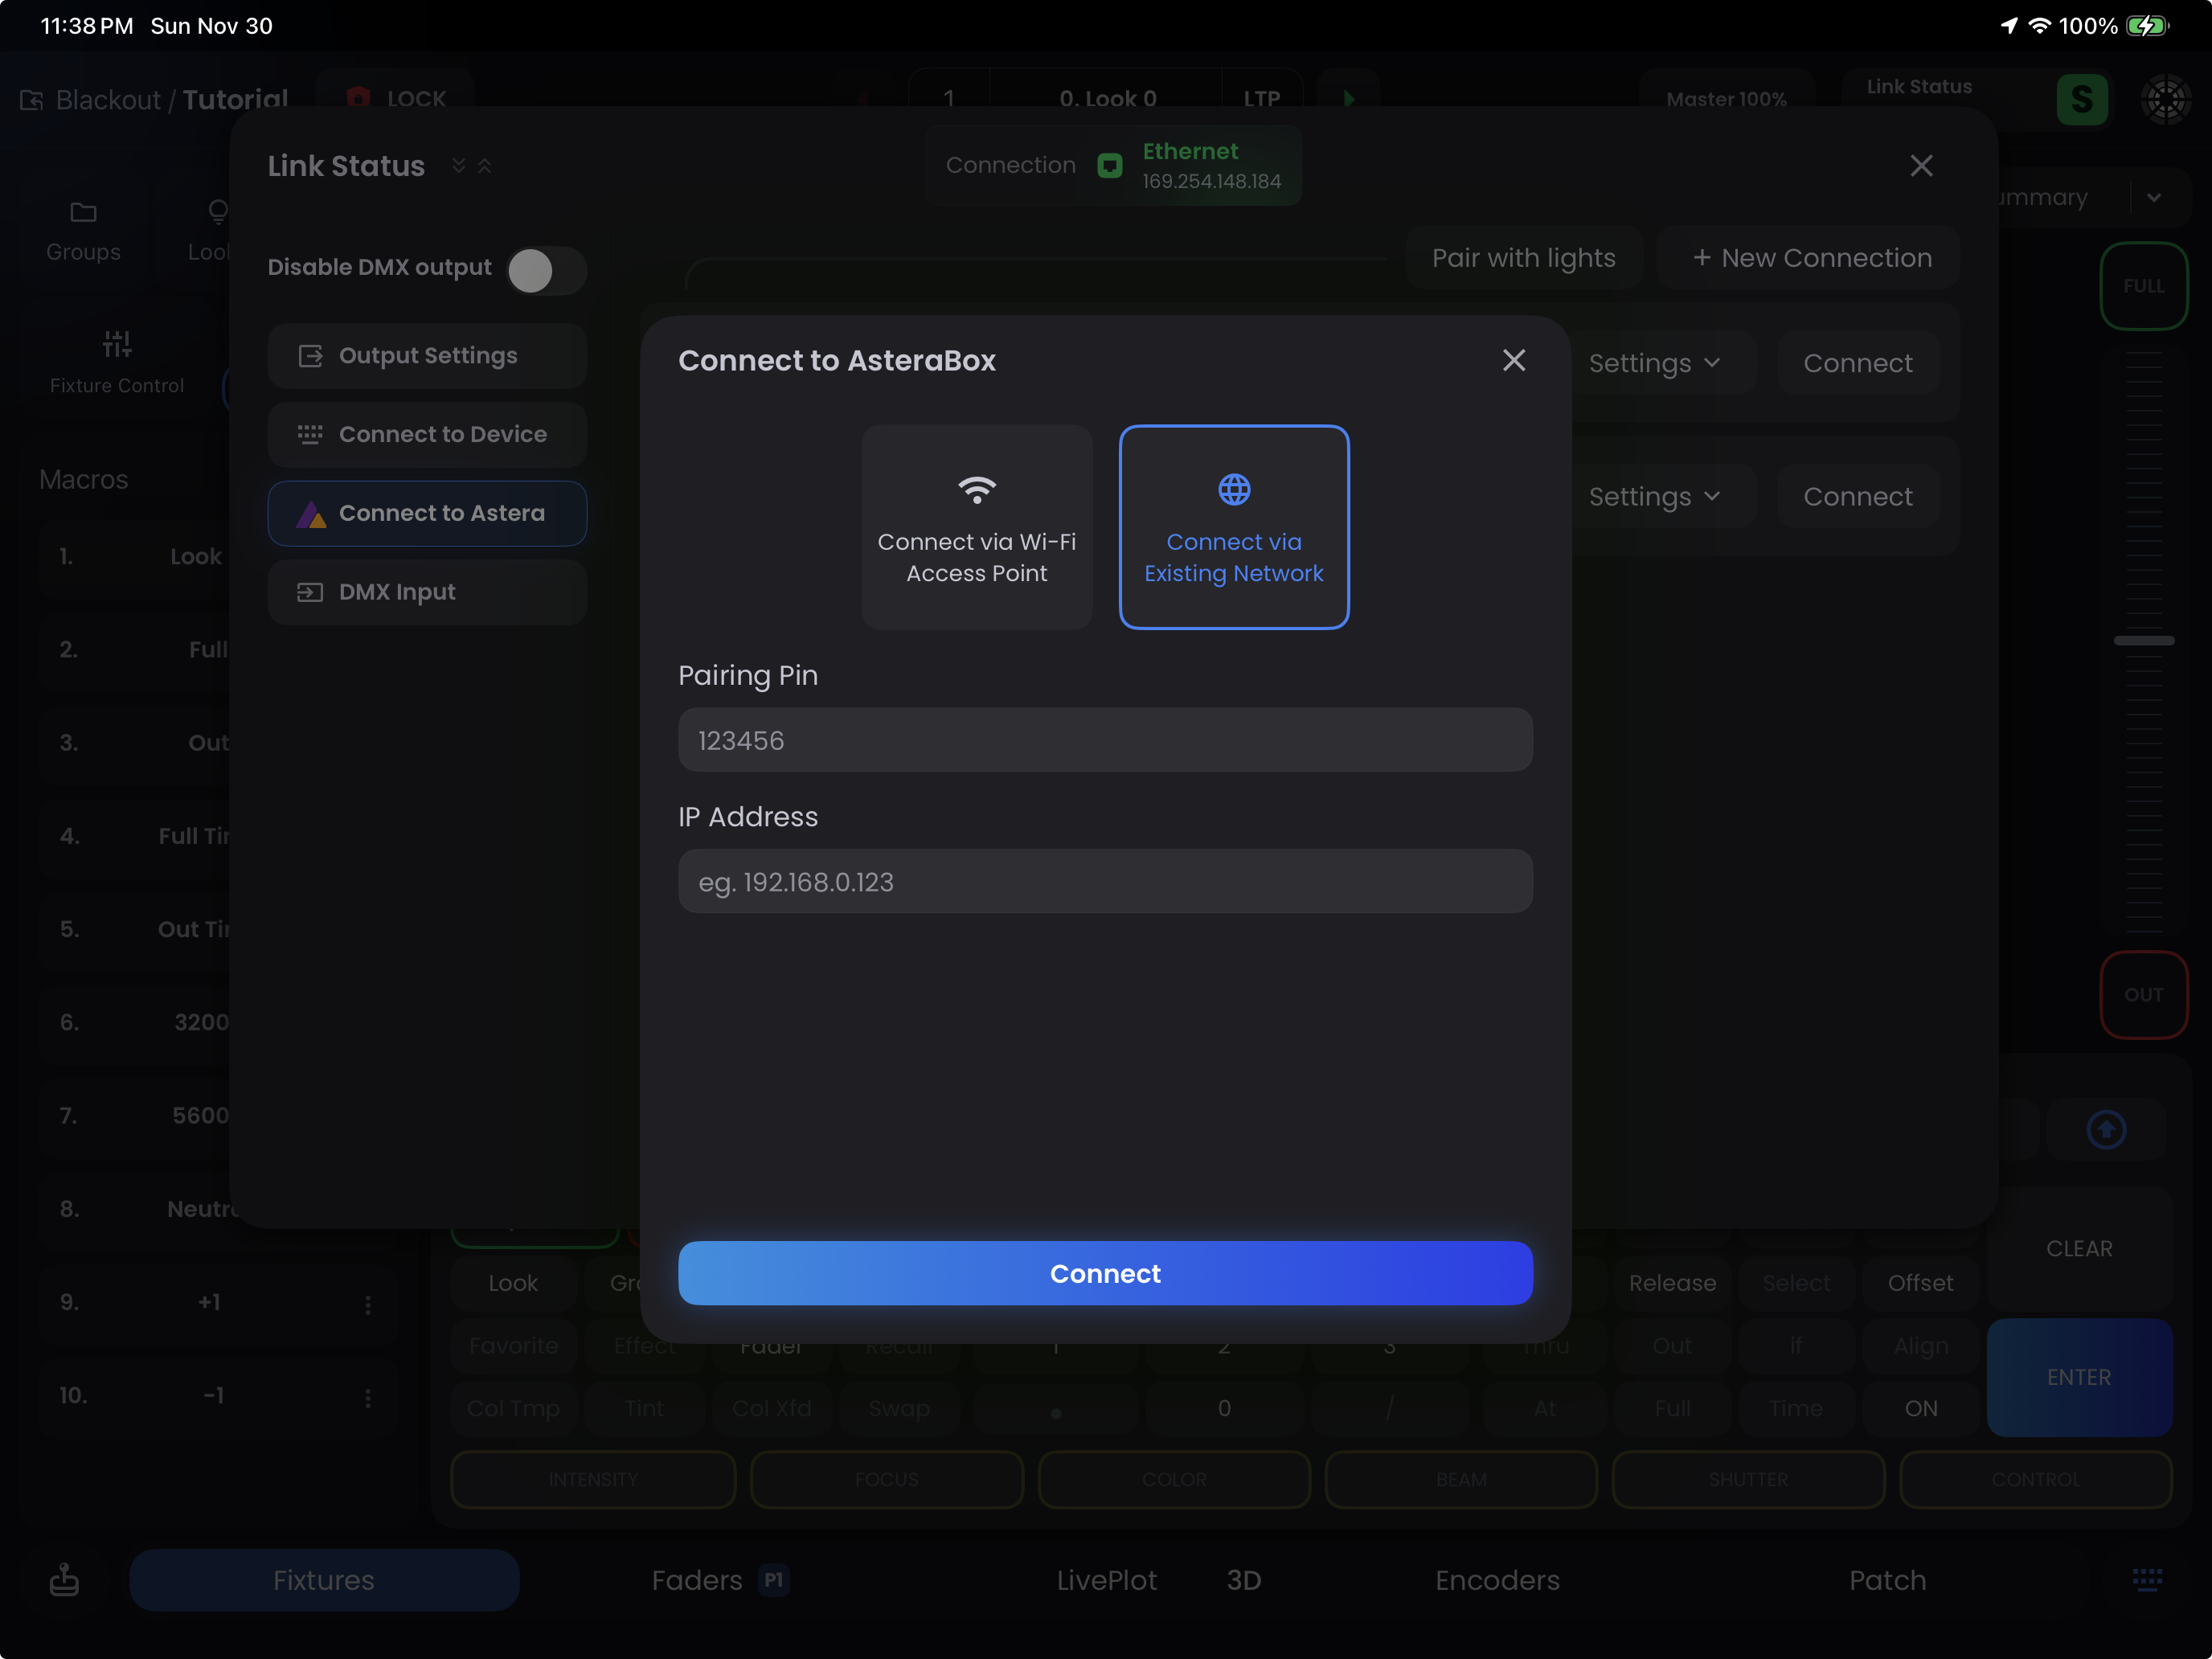
Existing Network (Advanced)
The ART7 joins your existing Wi-Fi network, allowing the iPad to remain connected to a router. This enables multi-universe setups and provides improved range and stability by leveraging your router's dedicated Wi-Fi capabilities.
Best for:
- Multiple CRMX transmitters/universes
- Larger productions with network infrastructure
- When you need the iPad connected to 5GHz Wi-Fi for better performance
Network Requirements:
- Router with 2.4GHz + 5GHz bands GLiNet recommended - (paid affiliate link)
- All devices on the same subnet (e.g.,
192.168.0.x)
Setup Steps:
Configure your router:
- Set router IP (e.g.,
192.168.0.1) - Configure SSID + password for both 2.4GHz and 5GHz bands
- Set subnet mask =
255.255.255.0 - Disable IGMP snooping (if applicable)
- Set router IP (e.g.,
Configure primary transmitter:
- Connect via Ethernet to router
- Set static IP in same subnet (e.g.,
192.168.0.201) - Enable sACN universe transmission
- Set Default Gateway = NO
Configure ART7 in AsteraNext app:
- Go to ART7 settings → Wi-Fi Settings
- Turn Access Point OFF
- Turn Join Network ON
- Join router's 2.4GHz network
- Assign static IP in same subnet (e.g.,
192.168.0.7) or set to DHCP - Set subnet mask =
255.255.255.0 - Set gateway to router IP or leave blank
- Save and reboot
Connect iPad and Blackout:
- Connect iPad to router's 5GHz network (for better performance)
- In Blackout →
Link Status→Connect to Astera - Select Connect via Existing Network
- Enter ART7 pairing PIN + static IP address
- Configure ART7's CRMX node if using it for an additional universe
NOTE
If you only want to use the ART7 for Astera-specific features (not as an additional CRMX universe), you can leave the ART7 CRMX node disabled after connecting. You will get better performance by only using the Wi-Fi of the ART7.
Using Your Connected ART7

Once connected, you will see a green dot indicator to the left of the Connect to Astera sidebar item. Once in the tab, you will see the connected AsteraBox banner displaying:
- Name/Label - Custom name for the box
- Version - ART7 firmware version
- Connection State - Shows connection status with IP address (green = connected, yellow = connecting, red = disconnected)
- CRMX Node Button - Toggle the ART7's built-in CRMX transmitter on/off
- Radio PIN - ART7's radio configuration
- Battery State - Power status indicator
- Settings Button - Access configuration options (see below)
- List of Lights Button - View and manage paired fixtures
Settings Menu
Tap the settings button to access ART7 configuration options. The menu has two tabs:
Manage Tab
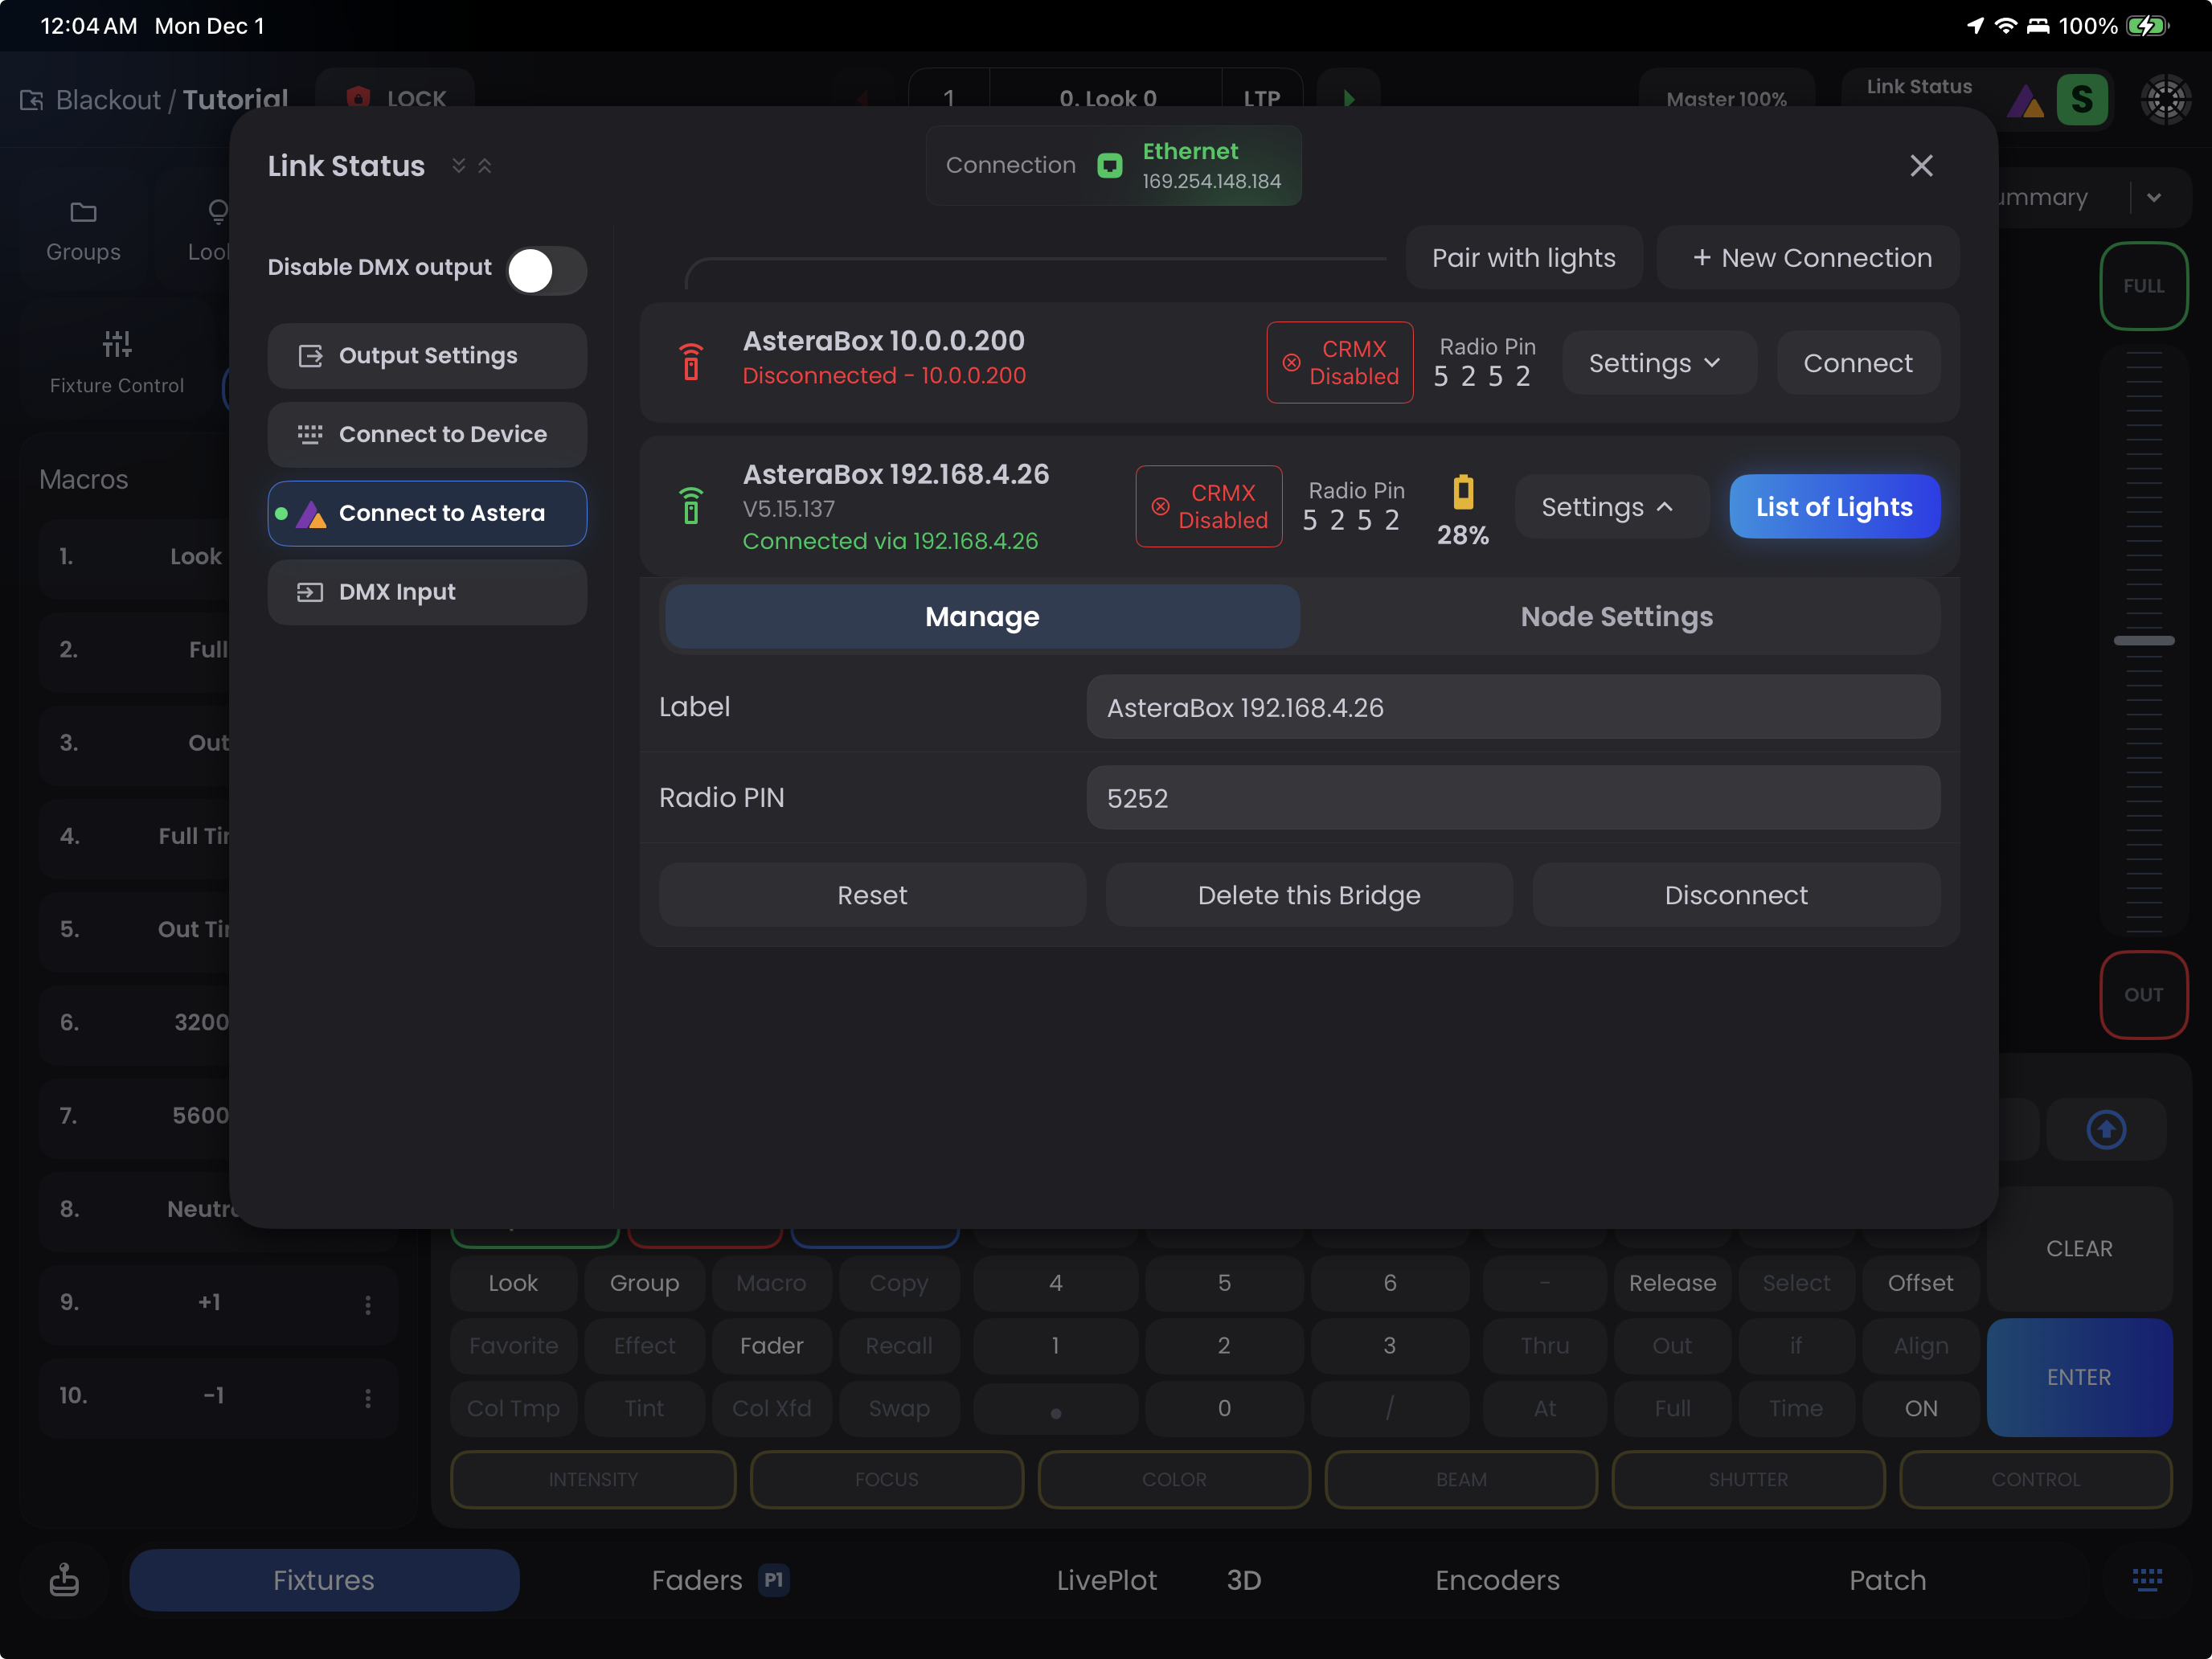
- Label - Custom name for the ART7 box
- Radio PIN - Configure the ART7's radio settings
- Reset - Restart the ART7
- Delete This Bridge - Remove the ART7 connection from Blackout (does not affect ART7 settings)
- Disconnect - Disconnect Blackout from the ART7 Wi-Fi
Node Settings Tab
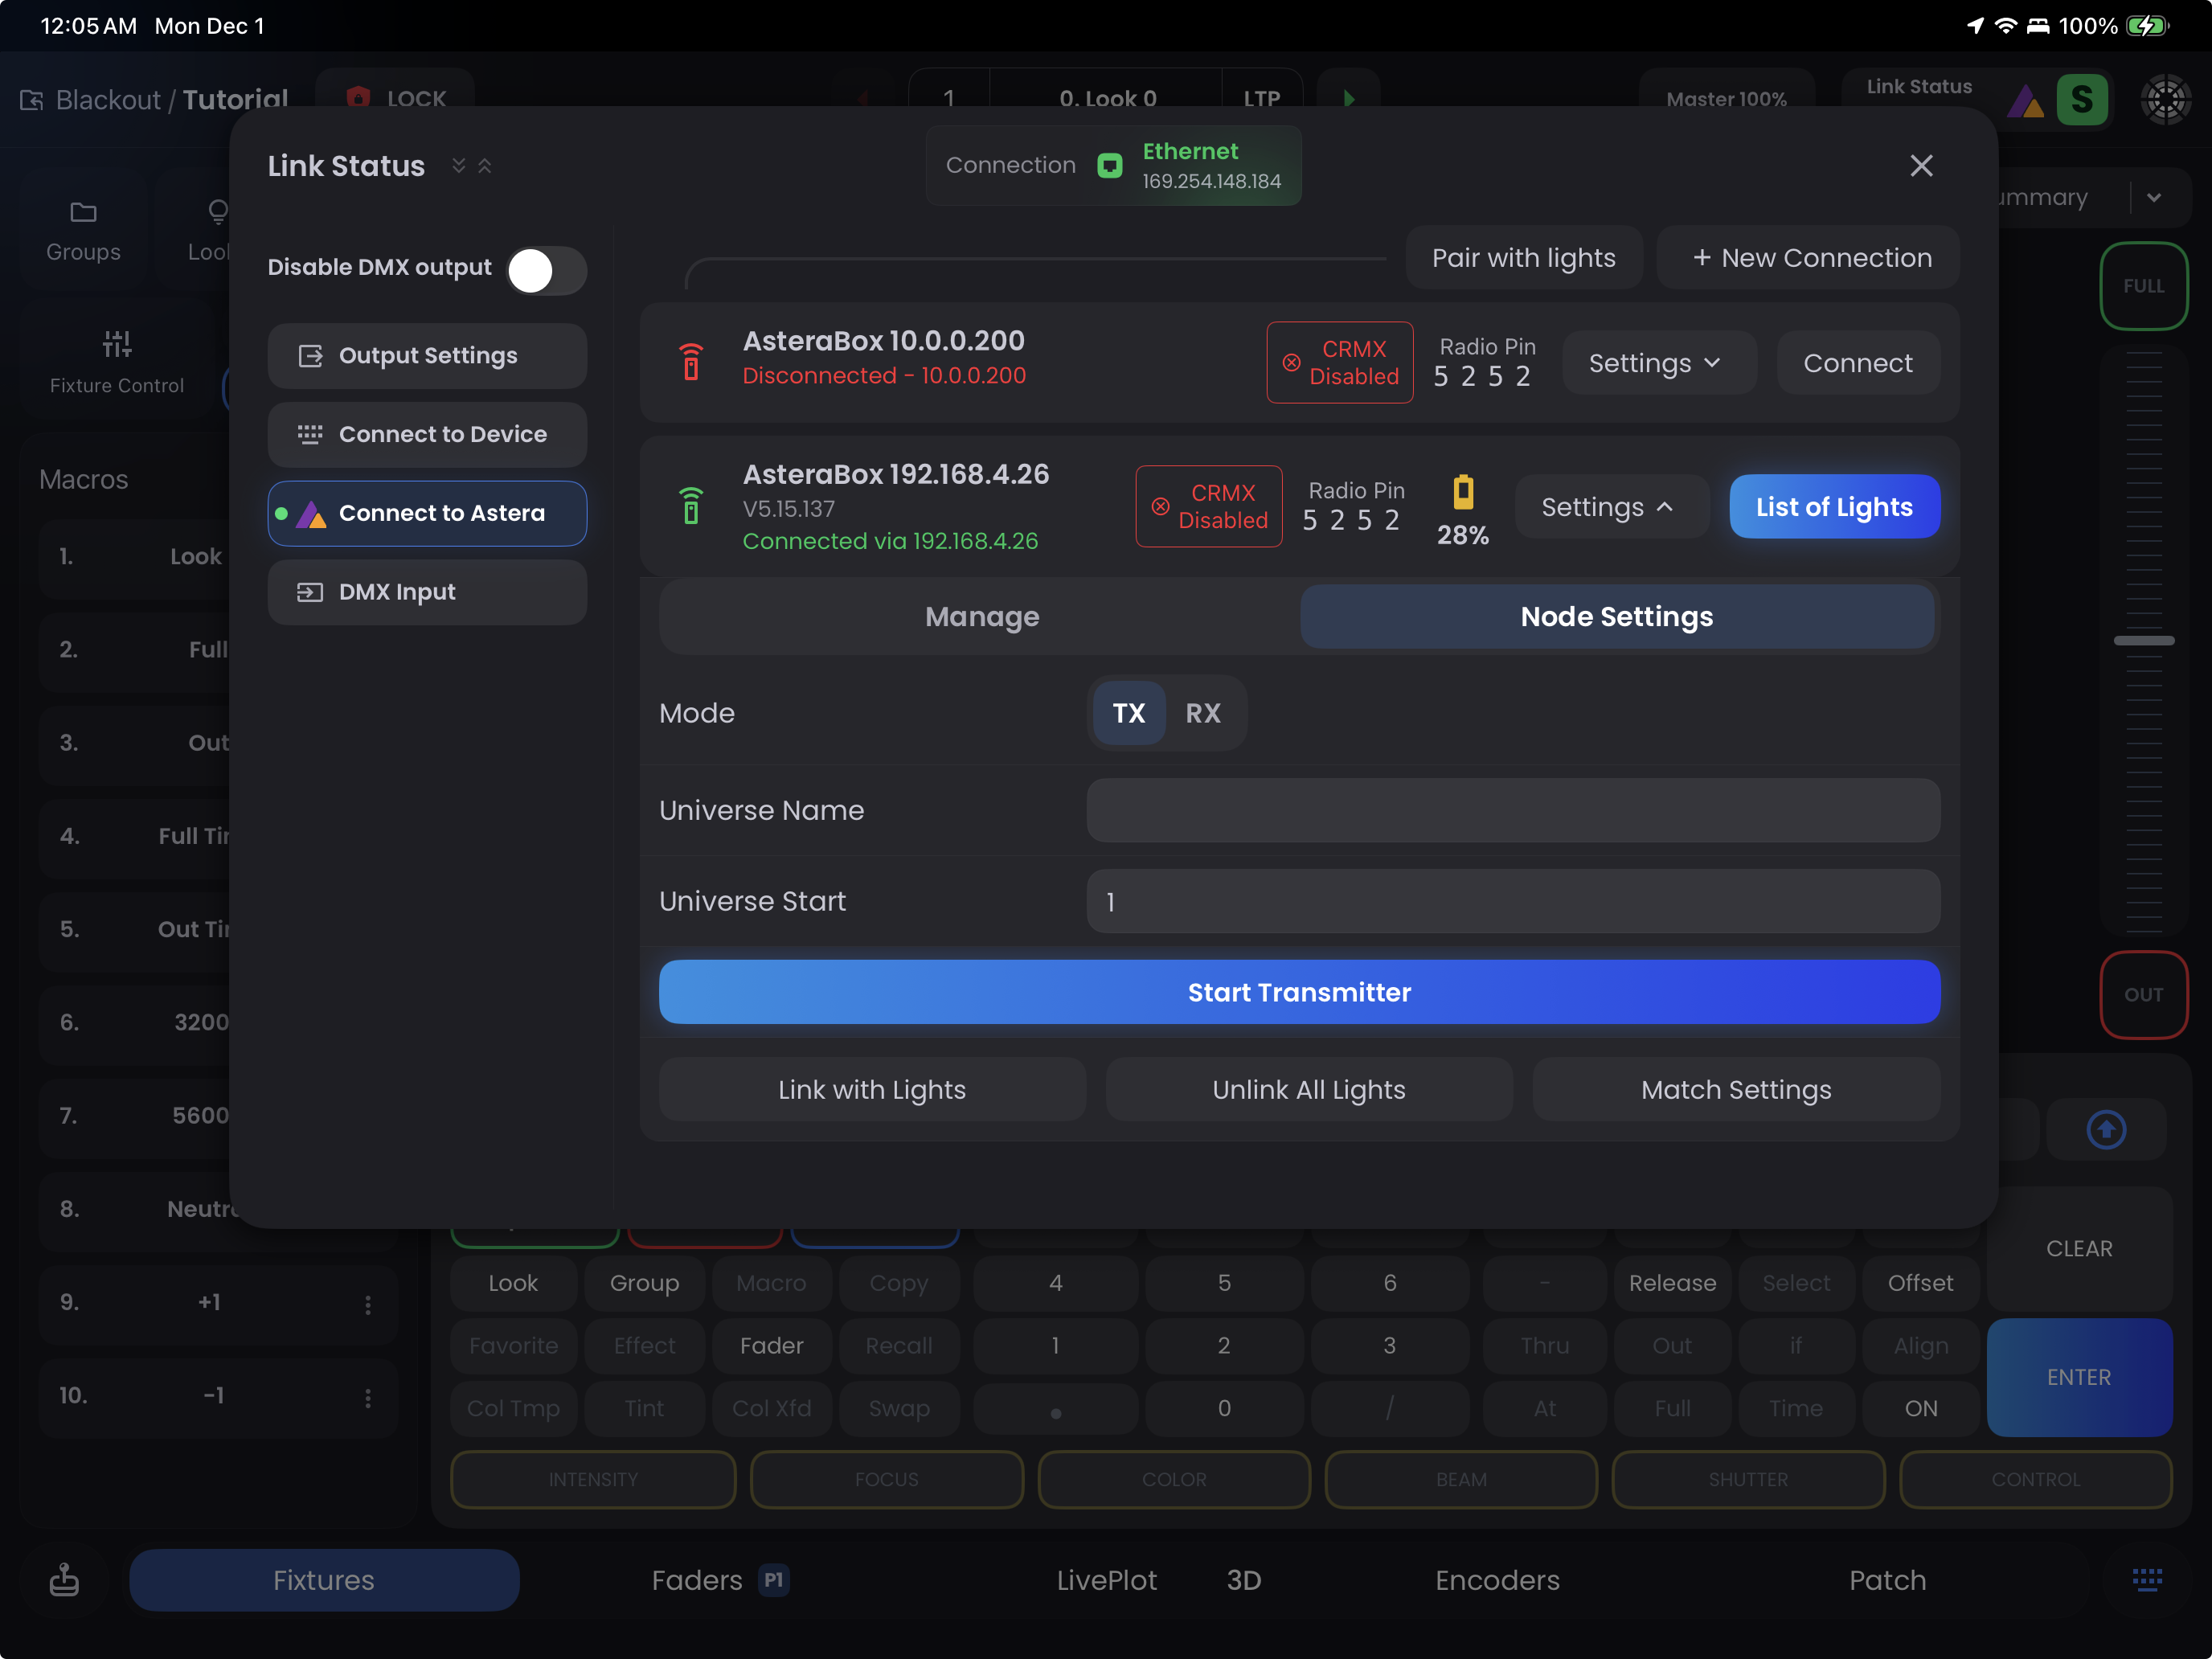
Configure the ART7's built-in CRMX transmitter:
- Mode - Display only (Blackout sets to TX automatically)
- Universe Name - Label for the CRMX universe
- Universe Start - Which sACN/Art-Net universe to transmit as CRMX
- Start Transmitter - Enable the ART7's CRMX node
- Link with Lights (CRMX) - Put the ART7 node in linking mode so fixtures can pair to it for CRMX control
- Unlink All Lights - Remove CRMX pairing from all fixtures linked to this ART7 node
- Match Settings - Sync universe settings between Blackout's Link Status output settings and the ART7 (Blackout will set its own output as well as the ART7 to sACN Universe 1)
Pair with Lights

At the top of the list of AsteraBoxes the Pair with lights button opens the pairing interface to add new Astera fixtures to the ART7:
- Put your Astera fixture in blue pairing mode (use the white remote or hold the power button on the fixture(s) until they start blinking blue)
- Tap
Pair with Lightsin Blackout - The fixture(s) pair via Astera's proprietary protocol (not CRMX)
- Paired fixtures appear in the List of Lights
IMPORTANT
This pairs fixtures to the ART7 for Astera-specific features like battery monitoring and fixture settings. You'll still need to link fixtures to your CRMX transmitter separately for DMX control.
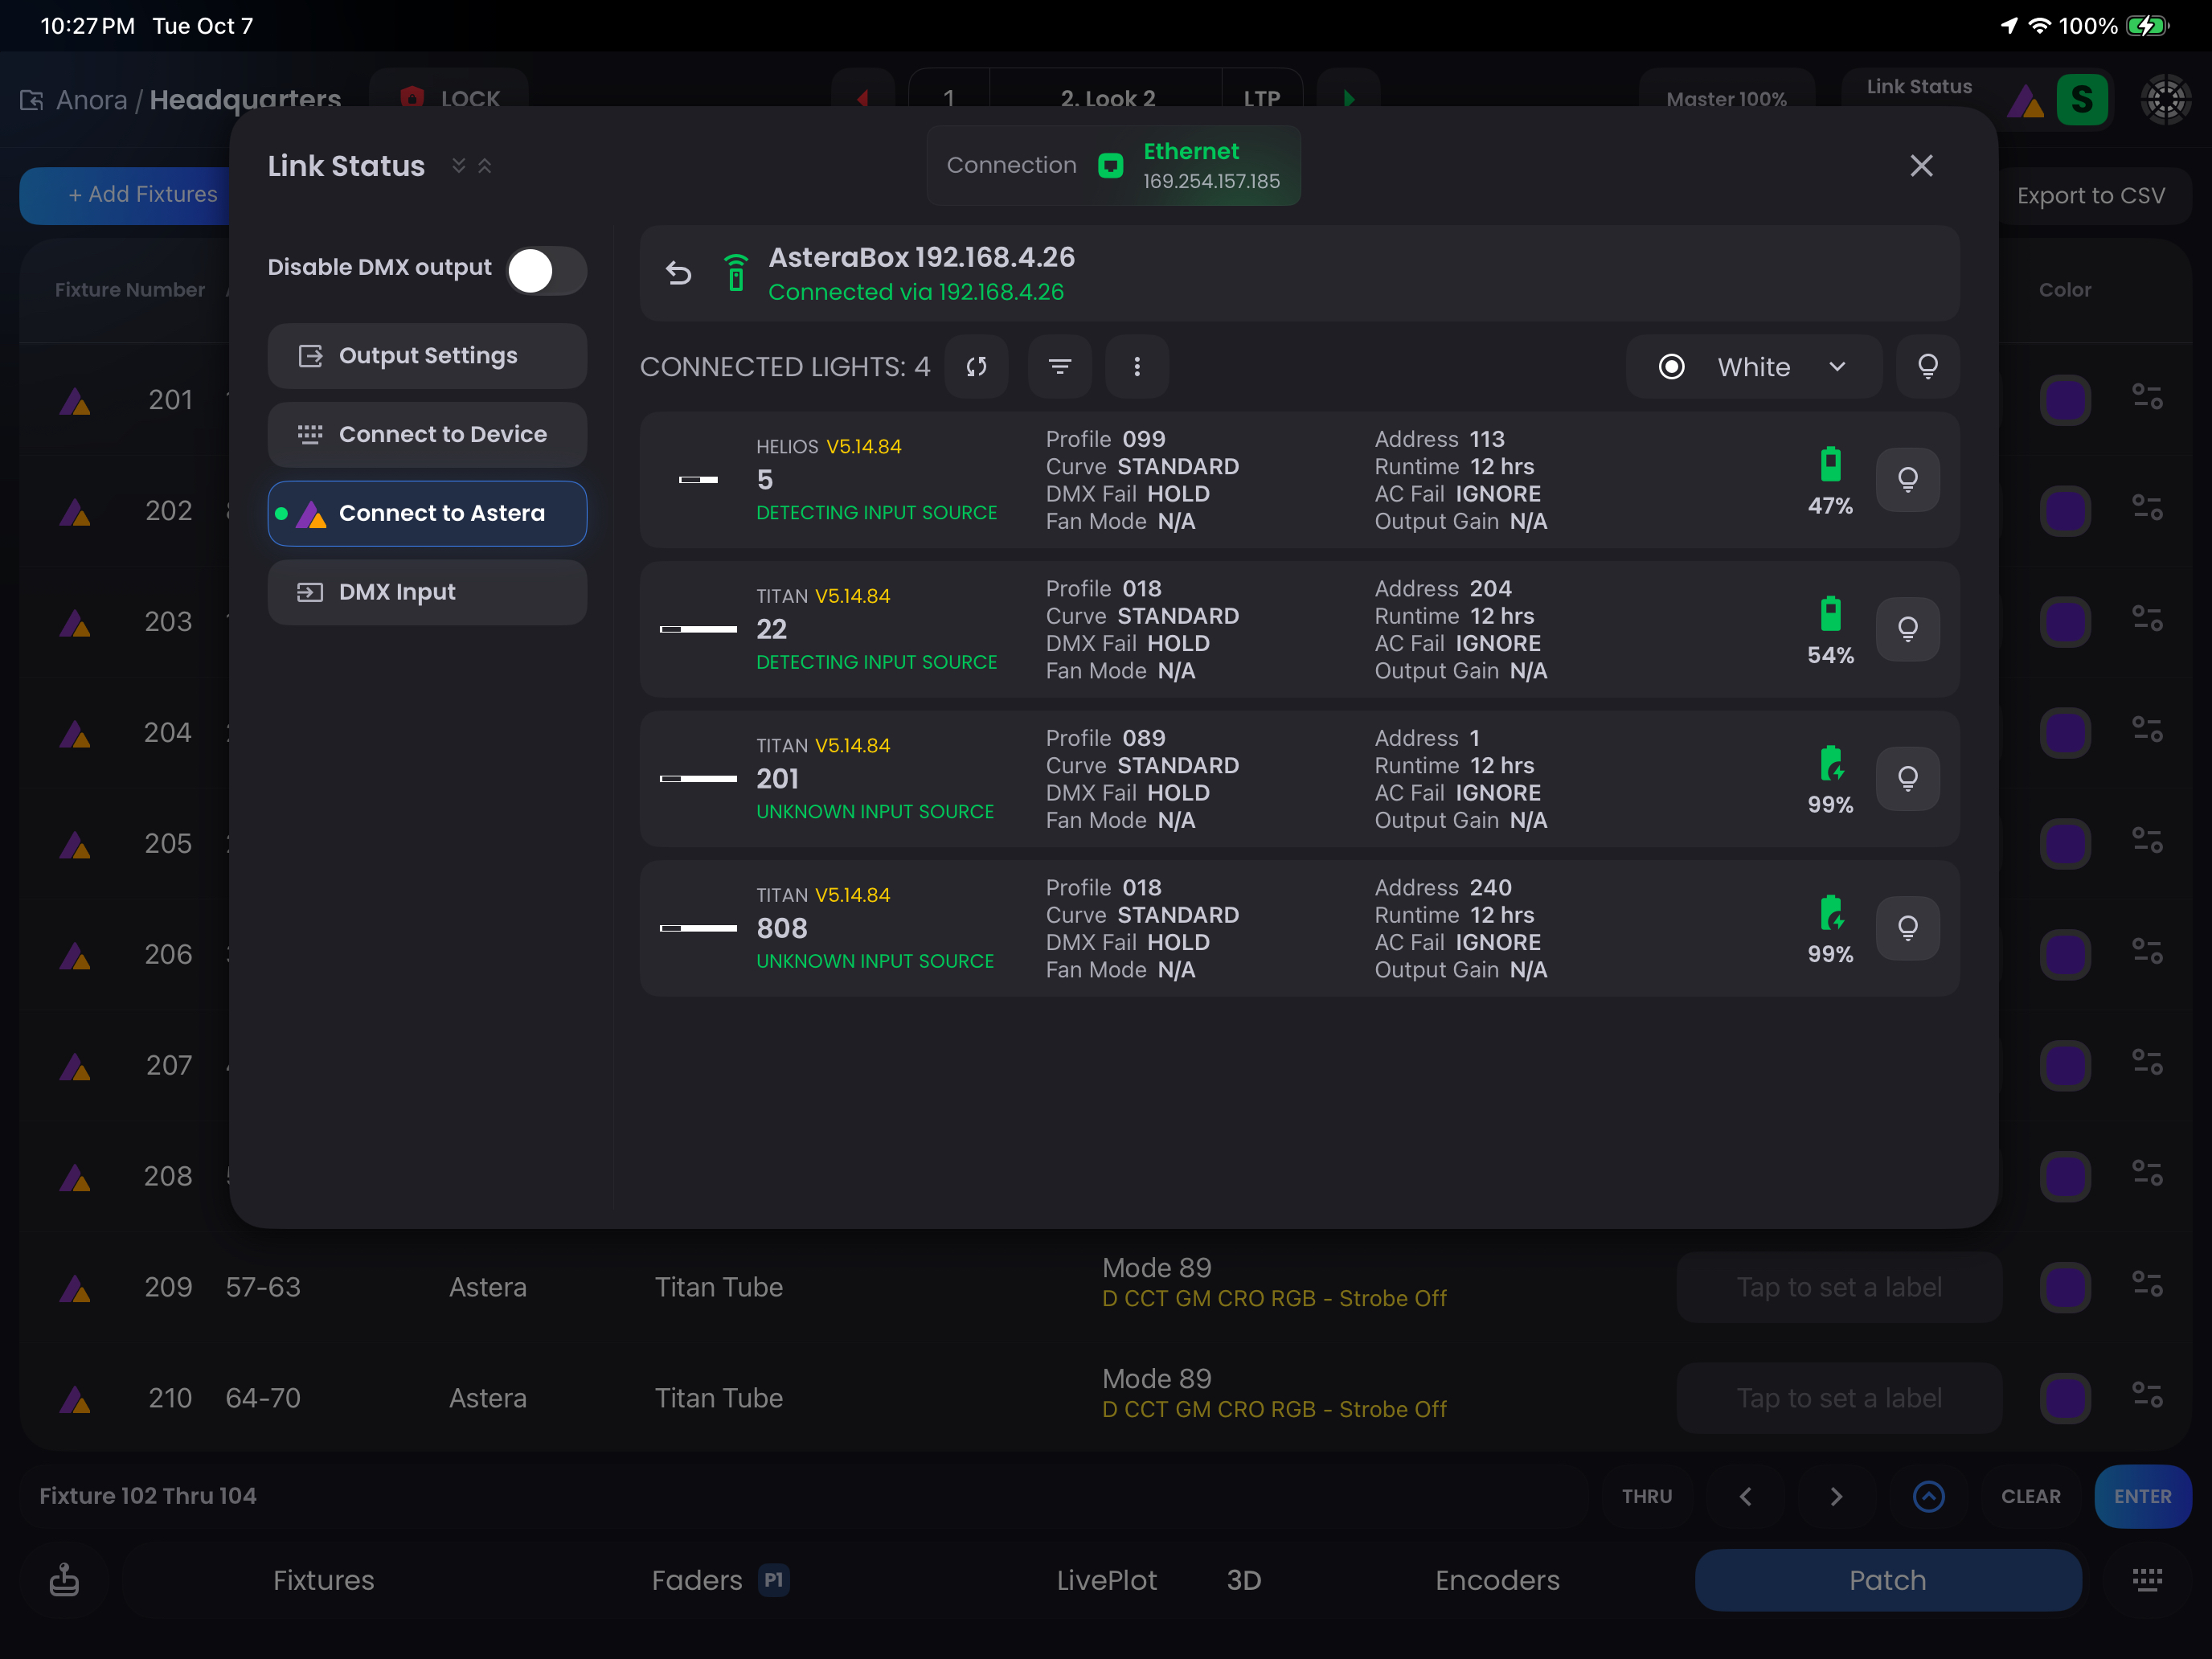
List of Lights
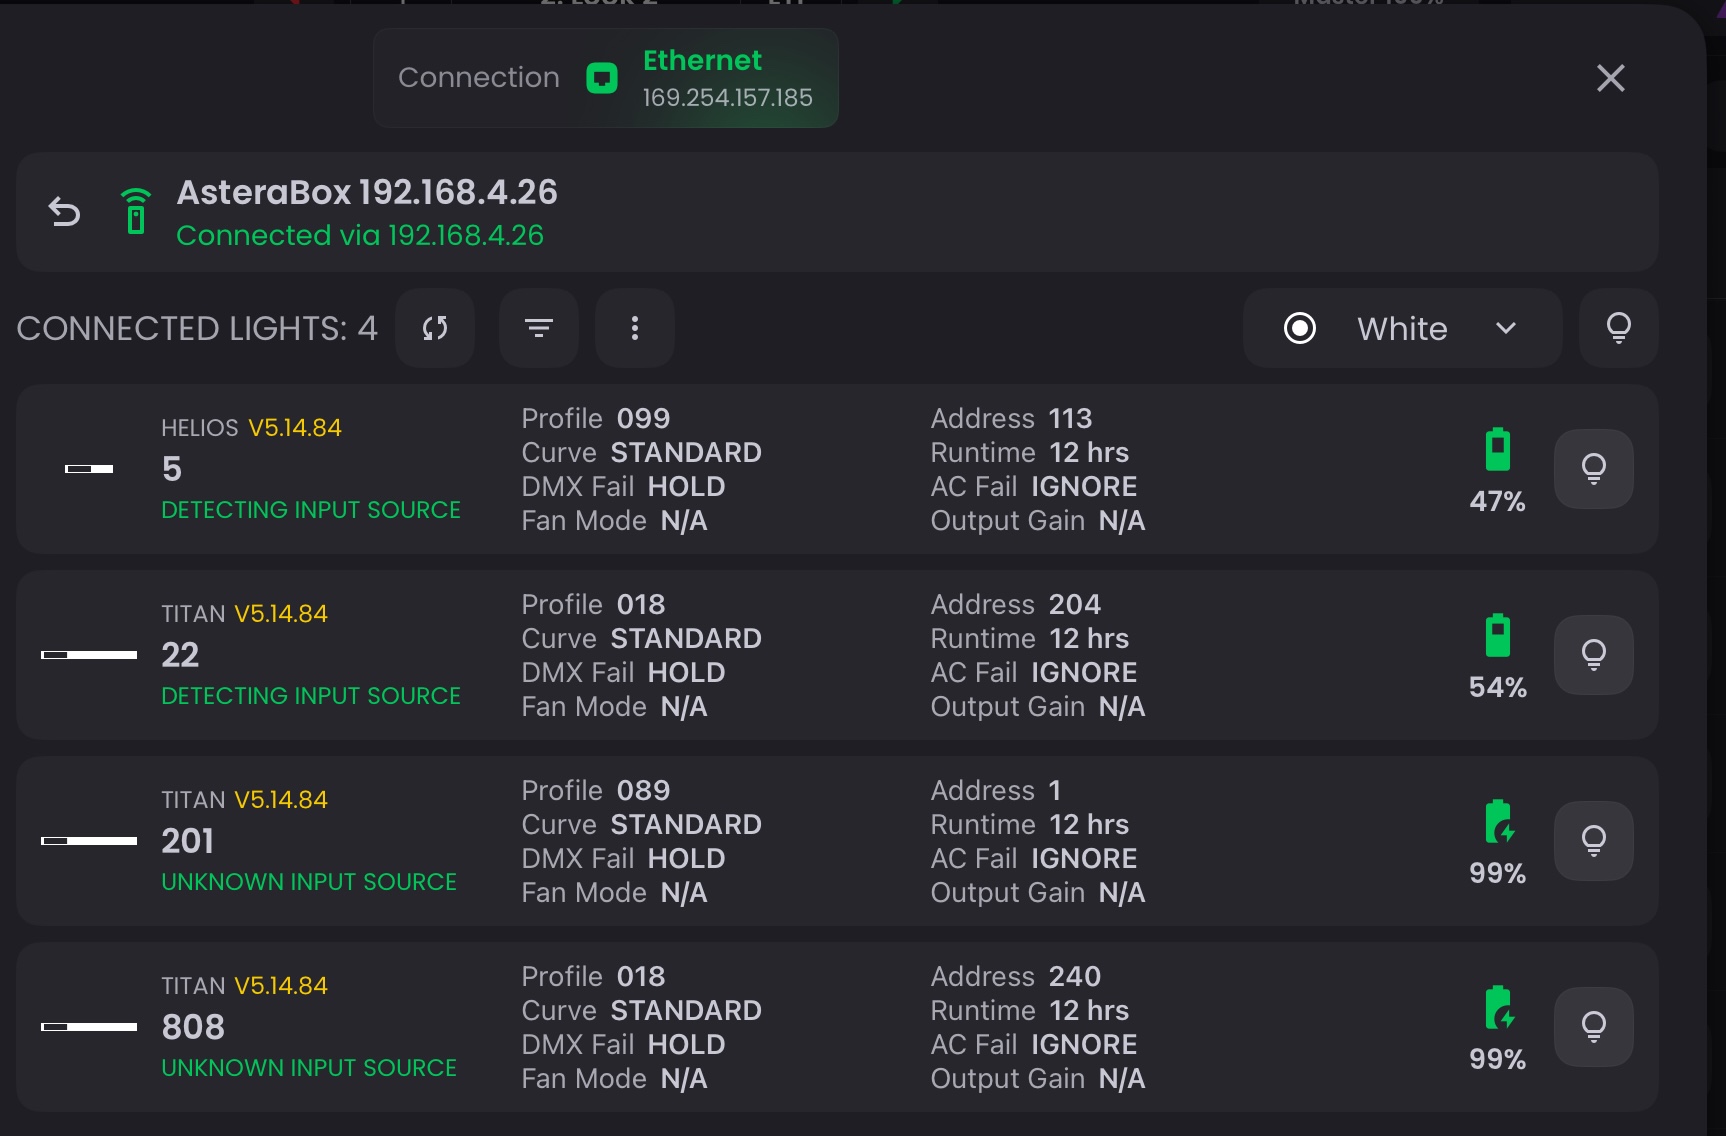
Displays all Astera fixtures paired to the ART7. Select one or more fixtures to access these tools:
Toolbar Actions:
- refresh Refresh List - Updates the list to show all currently paired fixtures
- filter_list Filter List - Filter fixtures by name, type, or status
- more_vert Action Menu - Access bulk operations:
- Reset - Factory reset selected fixtures (clears settings)
- Unlink CRMX - Remove CRMX pairing from selected fixtures (useful before linking to a different transmitter)
- Sleep - Put fixtures into low-power sleep mode
- Wake from Sleep - Wake fixtures from sleep mode
- palette Flash Color - Choose the color for flashing fixtures (red, green, blue, etc.)
- lightbulb Flash Fixtures - Flashes selected fixtures in the chosen color for quick identification on set
Quick Access
You can also open the List of Lights from Fixtures when in the Astera View State for faster fixture management while programming.
NOTE
Remember: Pairing via Astera protocol and linking via CRMX are two separate steps. After pairing fixtures to the ART7, you must also link them to your CRMX transmitter (ART7, Cerise, AKS, etc.) for DMX control to work. If fixtures don't respond to commands in Fixtures, they likely need to be linked to your CRMX transmitter.
Configuring Asteras while Patching in Blackout
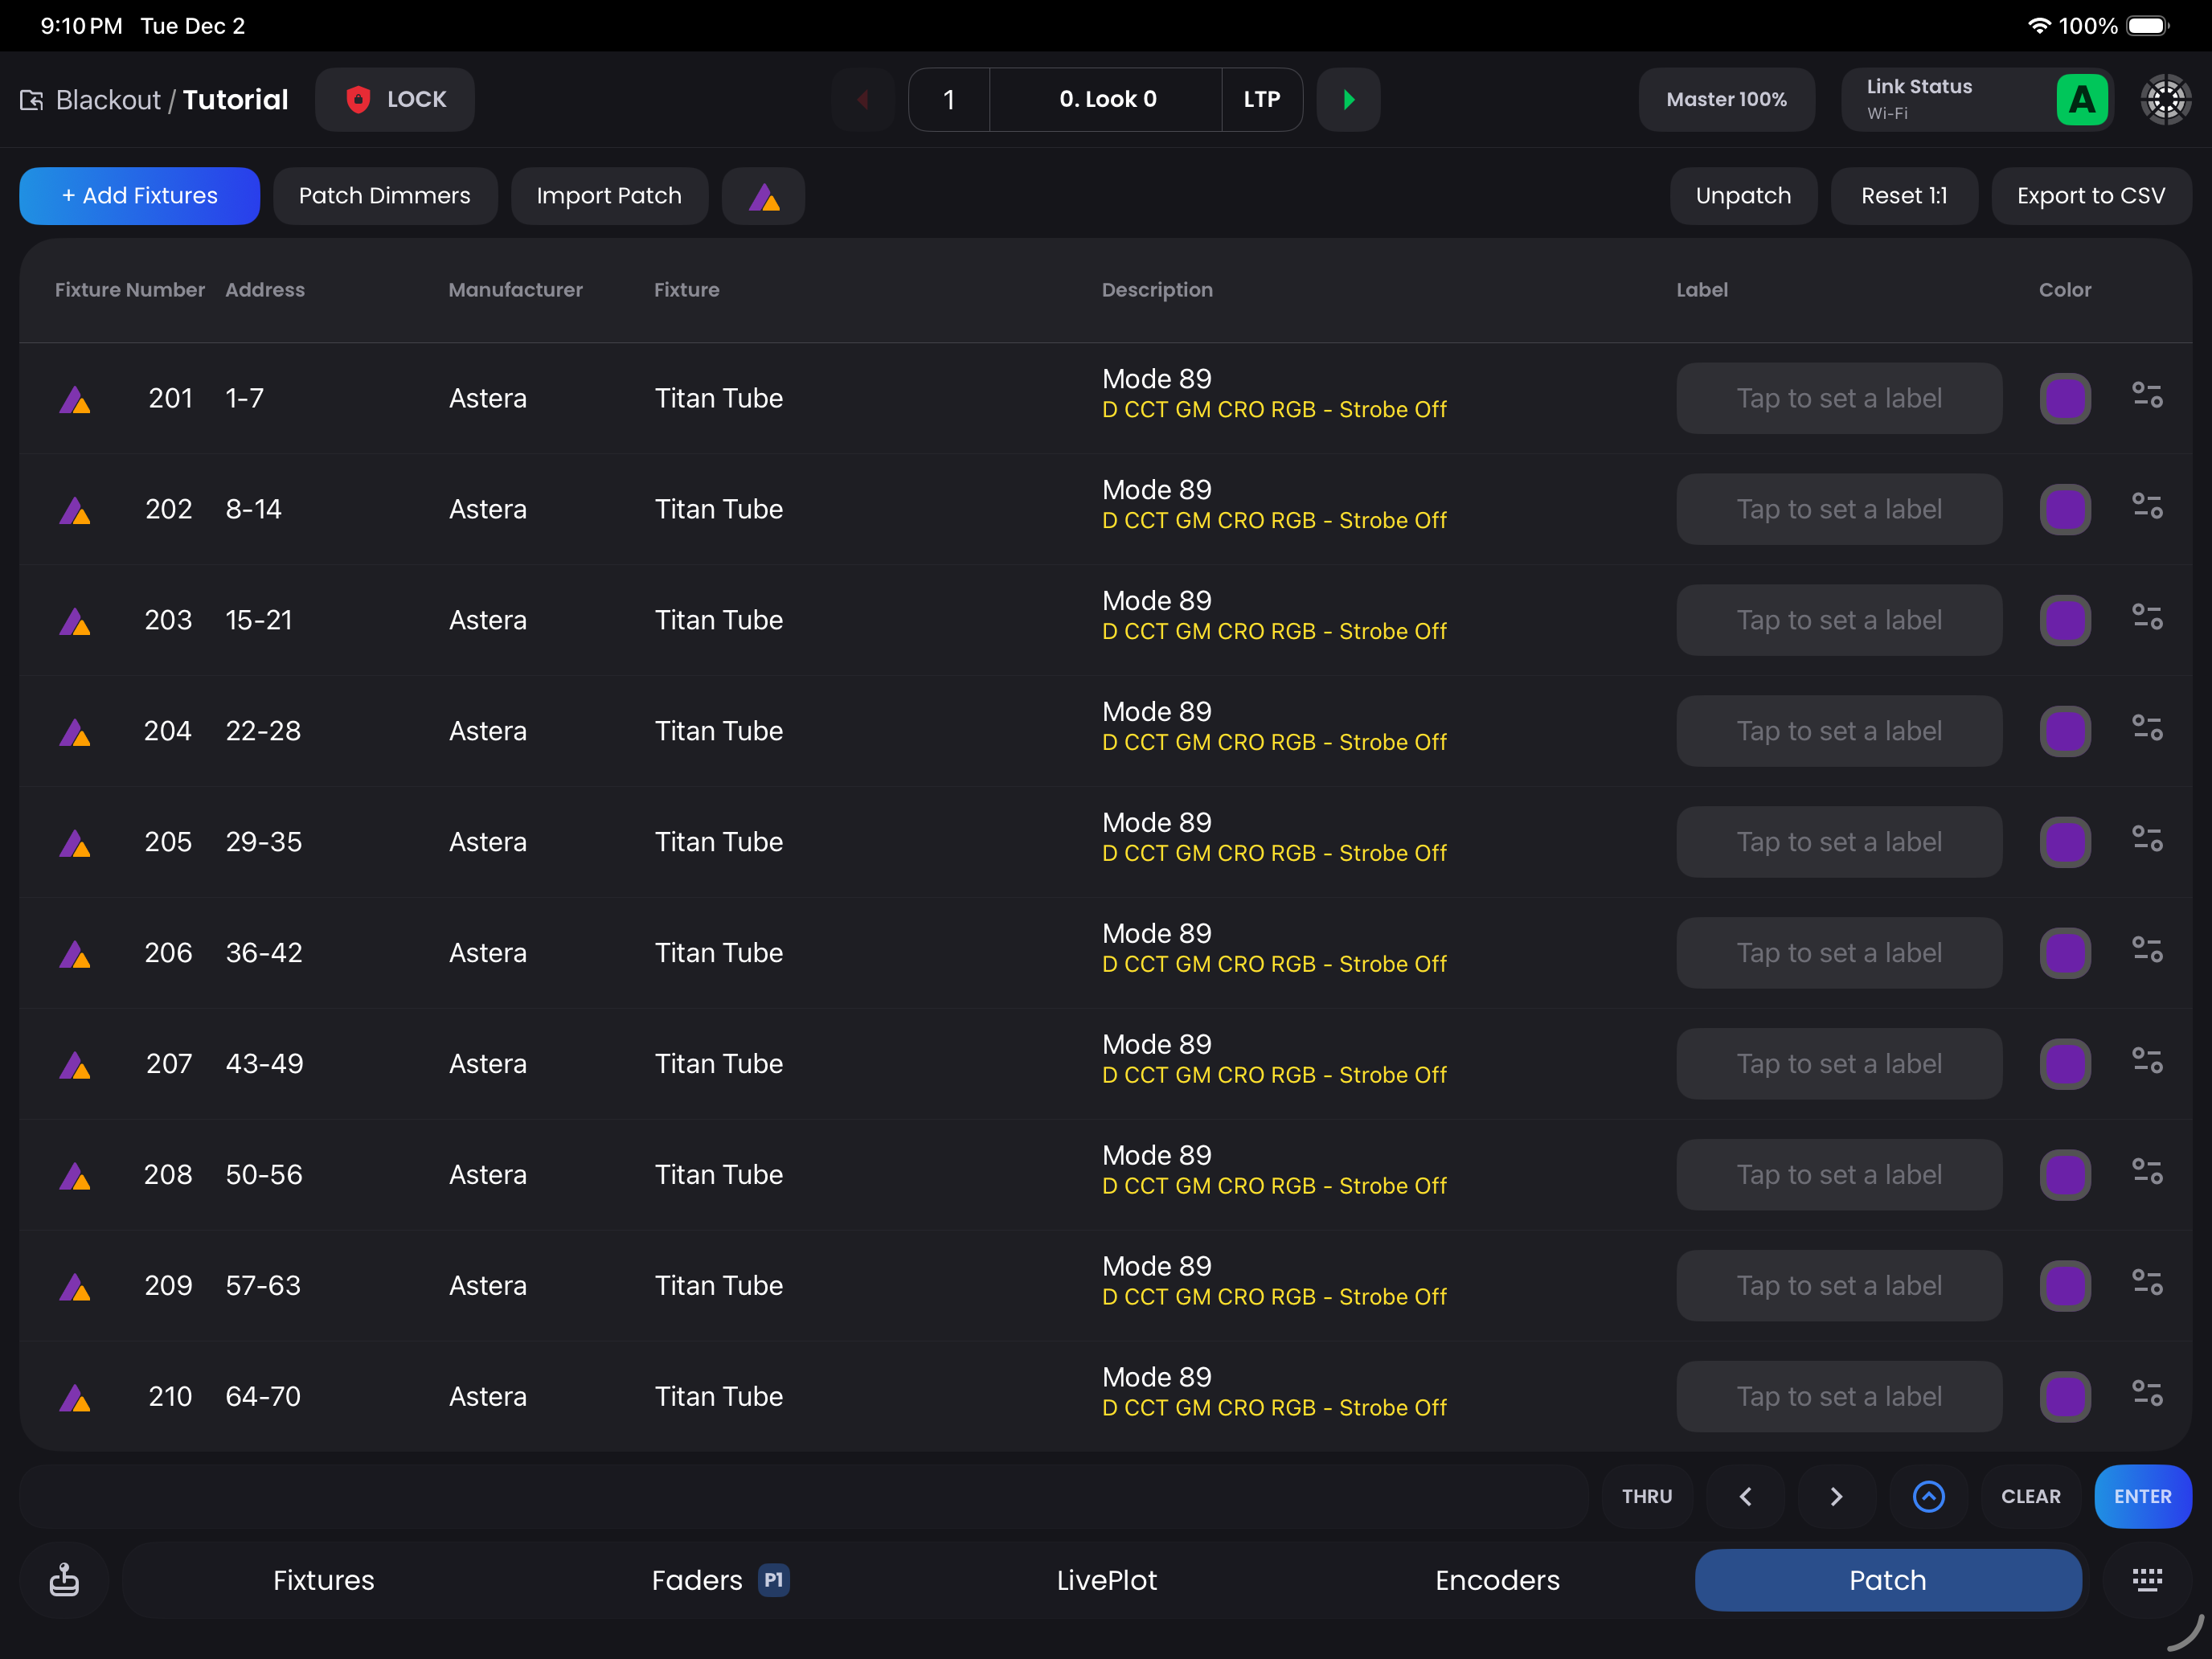
 DMX Configurator
After patching your Astera fixtures in Patch, you can use the DMX Configurator to send configuration settings directly to your lights.
How to Configure:
- Patch your Astera fixtures in Patch
- Tap the Astera logo in the navbar to open the DMX Configurator
- Review the auto-filled settings (DMX address, mode, fixture profile)
- Set any additional parameters you want configured (dimmer curve, runtime, etc.)
- Tap
Sendto push settings to the selected fixture type - Physically go to each light and press Enter to accept the settings
- Tap
Next Fixtureto move through all lights of that type - Use the button at the top to advance to the next fixture type
- Repeat until all fixtures are configured
What Gets Configured:
- DMX address
- DMX mode/personality
- Runtime settings
- Dimmer curve
- DMX fail behavior
- Other Astera-specific parameters
Auto-Fill Intelligence
The DMX Configurator automatically fills in all the essential settings based on your patch, so you only need to adjust Astera-specific parameters before sending.
Alternative Method: Select unconfigured Astera fixtures in the Astera View State on Fixtures and use the Assign to patch button to auto-configure them.
Warning
After sending configuration data, you must physically press the Enter button on each fixture to accept the new settings. This prevents accidental configuration changes during live shows.
Using Astera Features in Blackout
Astera View State
The Astera View State is a specialized control mode in Fixtures that gives you direct access to Astera-specific functionality alongside your standard DMX controls.
What You Can Do:
- battery_charging_full Real-time Battery & Signal Monitoring - See battery percentage, runtime, CRMX signal strength, and status for all connected Astera fixtures at a glance
- settings Quick Fixture Configuration - Adjust Astera-specific settings like Dimmer Curve, Runtime, DMX Fail, and other parameters not available via standard DMX
- sync Assign to Patch - Tap the
Assign to patchbutton to auto-configure selected Astera lights to patches in Blackout, syncing fixture profiles after patching or making changes - list Access List of Lights - Jump directly to fixture management tools for pairing, unlinking, and identification
When to Use Astera View State
Switch to Astera View State when you need to check battery levels or CRMX signal strength, identify fixtures needing charging, adjust Astera-specific parameters, or sync fixture profiles in Blackout.
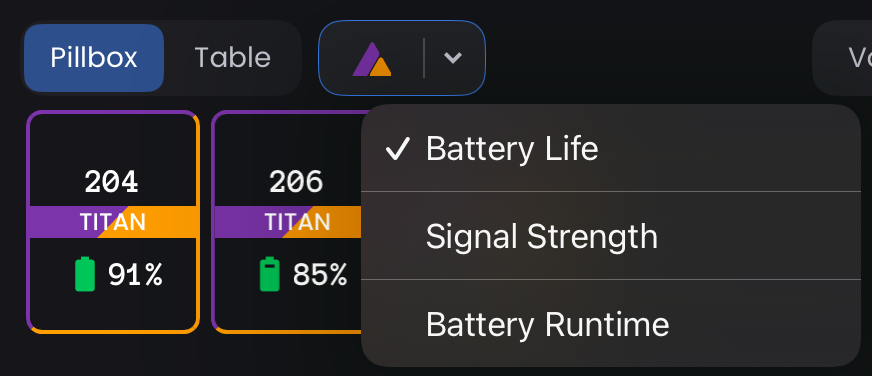
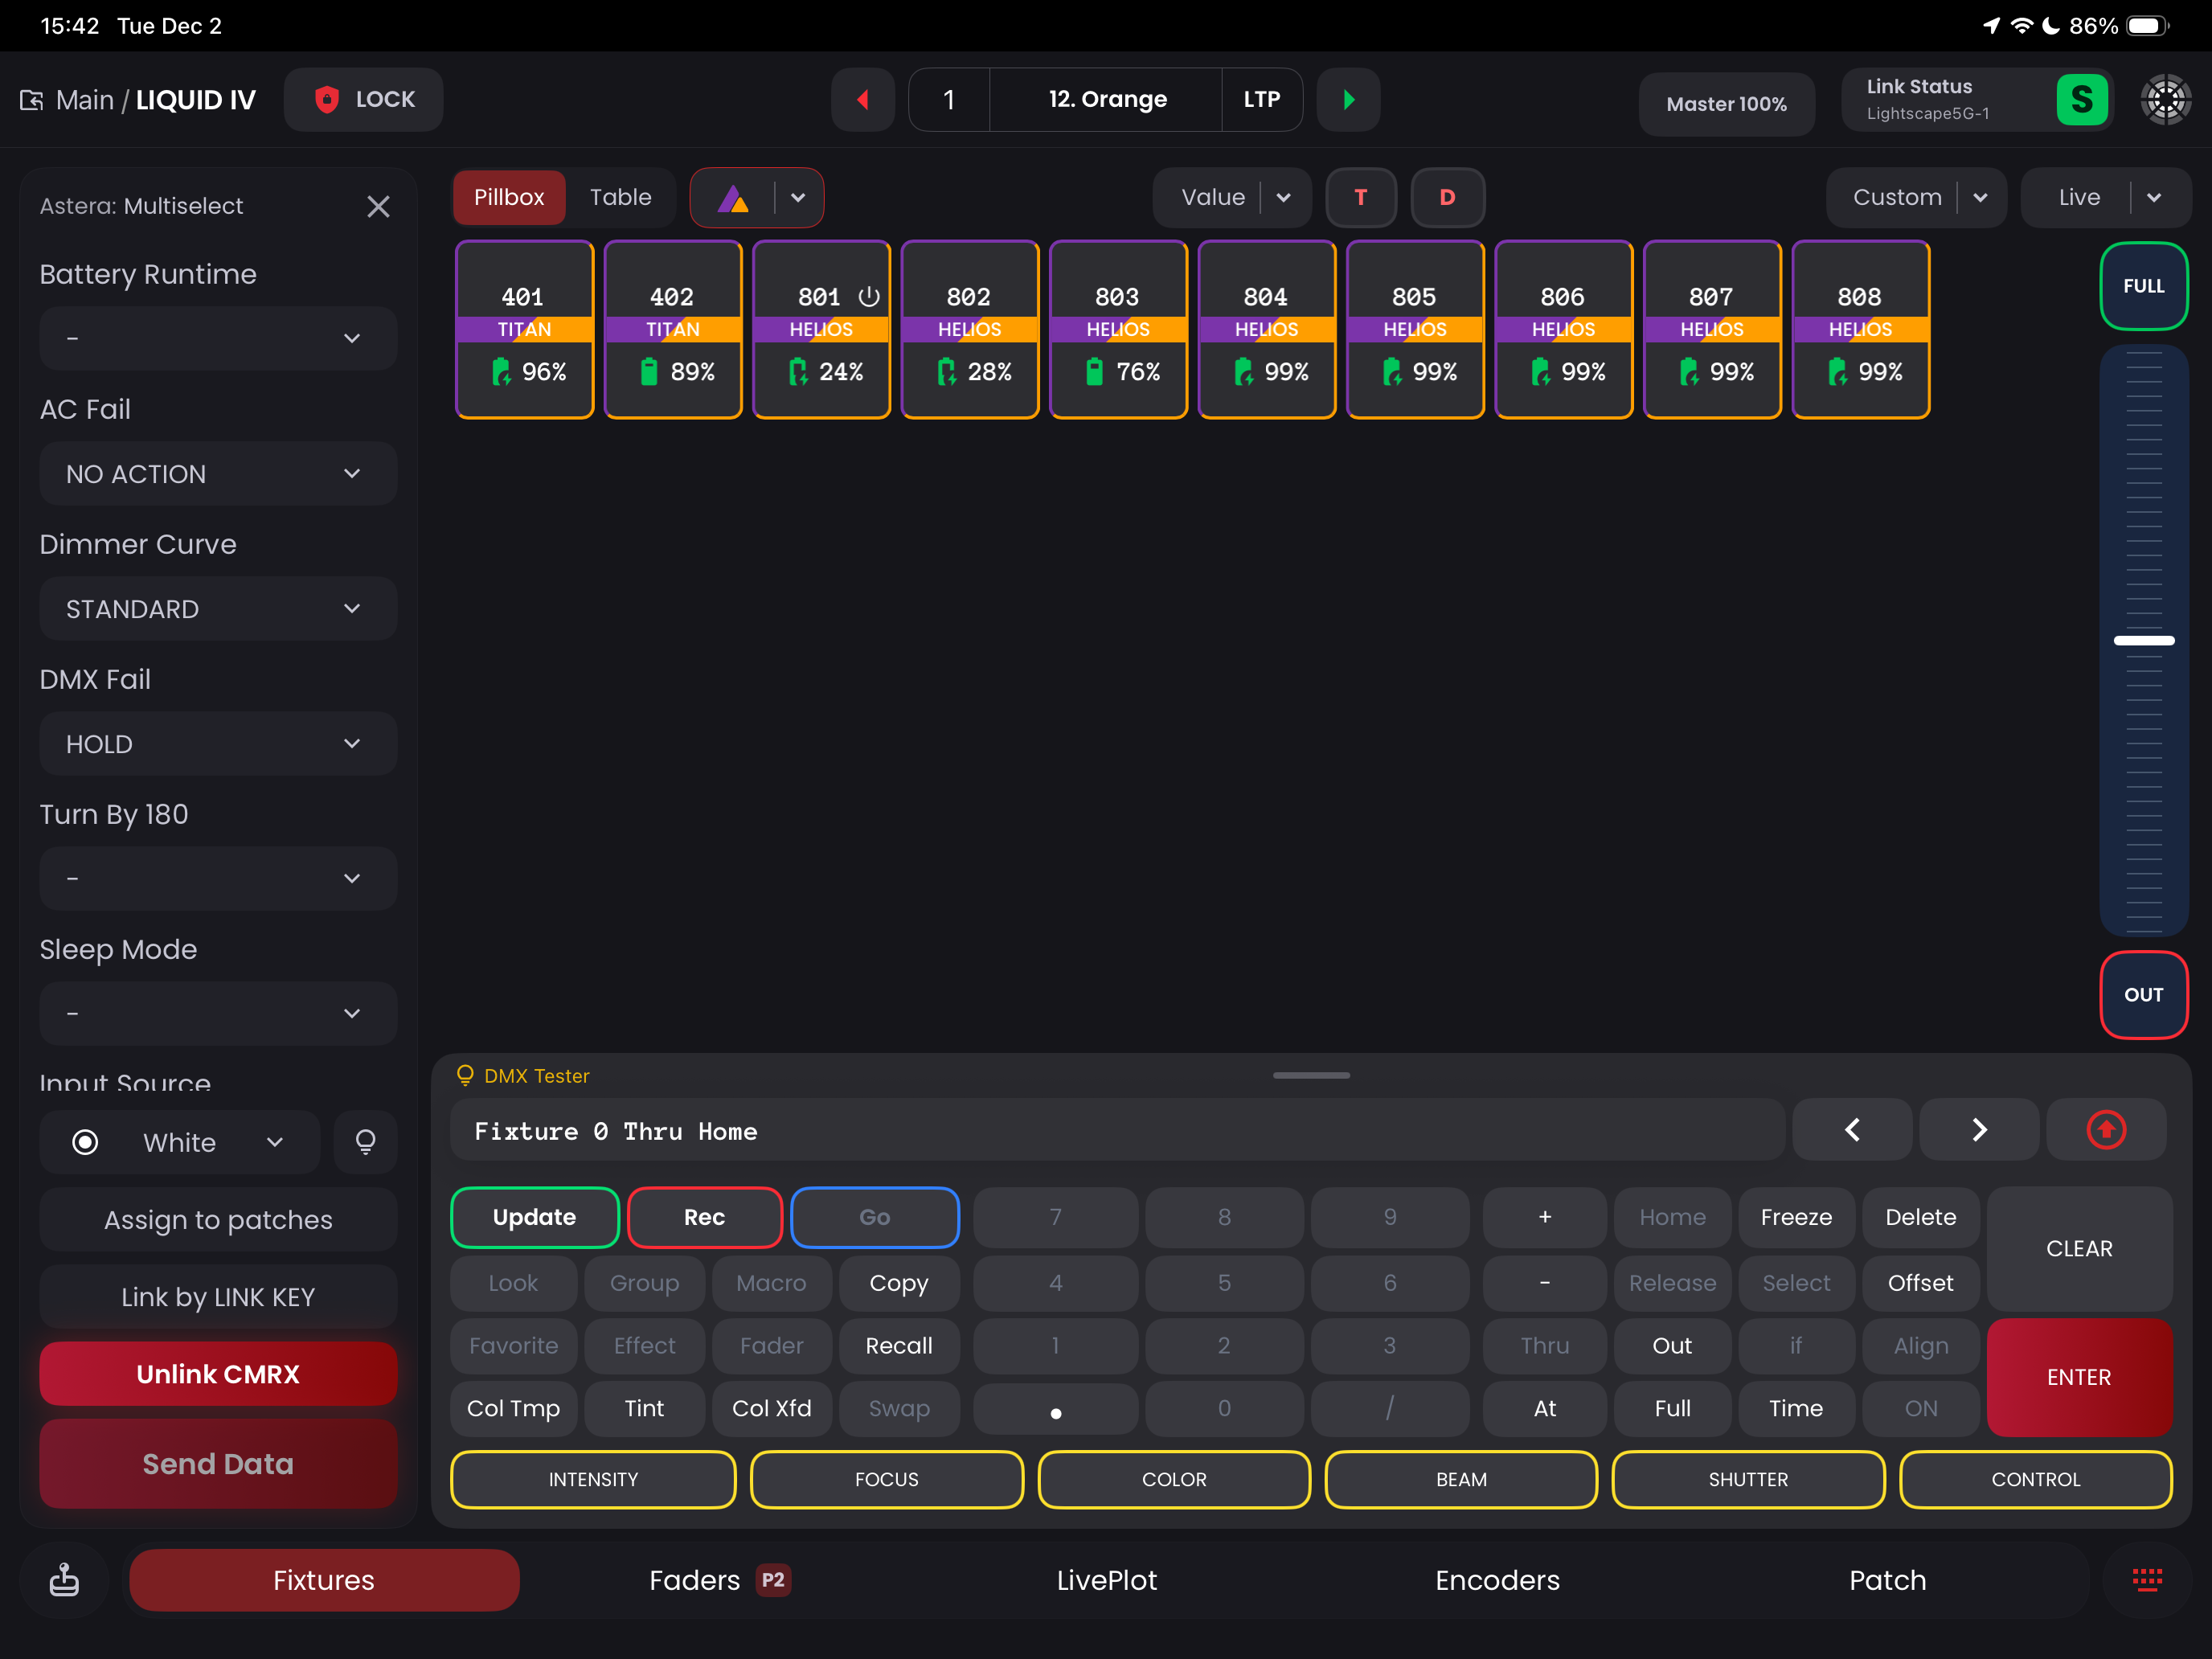
Battery Monitoring
Battery status is displayed in both the Astera View State and Pillbox View in Fixtures, giving you real-time visibility into your fixtures' power levels.
What the Battery Display Shows:
- Percentage - Current charge level (0-100%)
- Status Icons - Charging, full, low battery warnings
- Color Coding - Green (>35%), Yellow (>20%), Red (low/critical)
Important Considerations
Dual Connection
You'll always have two connections to your Astera lights:
- Astera protocol for configuration and special features
- DMX → CRMX for standard lighting control
Make sure all fixtures are linked to your CRMX transmitter (ART7, Cerise, AKS, etc.) or they won't respond to DMX commands.
Spacing & Interference
- Keep ART7 and primary transmitter at least 1 ft apart (both use 2.4GHz)
- For advanced setups: Connect iPad to 5GHz Wi-Fi, keep ART7 on 2.4GHz (requires dual-band router)
Connection Limitations
- Cannot connect to ART7 via AsteraNext app and Blackout simultaneously
- When using AsteraNext app, connect via Bluetooth to preserve Wi-Fi bandwidth
Network Best Practices
- Use a router with both 2.4GHz and 5GHz bands (GLiNet recommended)
- Mount ART7 WiFi close to router for stable connection
- Consider velcro mounting ART7 WiFi directly to router for maximum reliability
Troubleshooting
ART7 won't connect?
- Make sure you have an ART7 WiFi version
- Double-check SSID/password (case-sensitive)
- Place ART7 WiFi closer to router or iPad
- Turn off other CRMX receivers during setup
- Power cycle ART7 WiFi and wait 1 minute
- Verify firmware is 5.15.1.37 or later
Fixtures not responding?
- Ensure fixtures are linked to your CRMX transmitter
- Check that CRMX node is enabled (if using ART7 as transmitter)
- Verify fixtures are patched in Blackout
Connection keeps dropping?
- Use a router instead of direct ART7 access point
- Connect iPad to router's 5GHz band
- Keep ART7 away from other 2.4GHz devices